

 Information
Notifications
Tutorials
175. Manga Function: Let's create a manga manuscript
- Manga Function: Let's create a manga manuscript
- Manga Function: Master the Manga creation tools
- Manga Function: Make Use of Materials
- Manga Function: Publishing and Printing your Manga
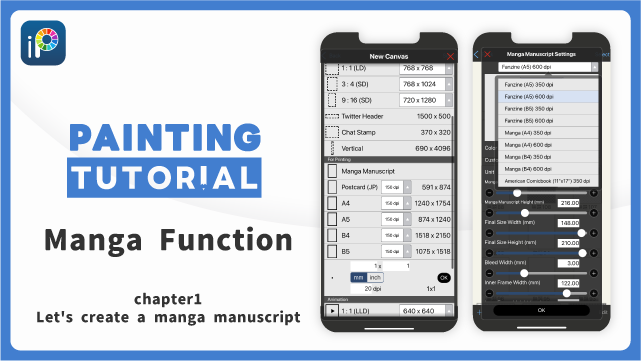
This chapter provide a detailed explanation of the basics of drawing manga to be printed, such as manuscript size, guidelines, Color Mode, moiré patterns, and resolution (dpi).
Choosing the size for your manuscript
This section will cover the size for your manga manuscript. In ibisPaint, a Canvas for manga printing will be created when you create a new Canvas. Fanzine, Manga, and American Comicbook templates are available, so you can easily create a Canvas that conforms to manga manuscript paper specifications by simply selecting a manuscript type from the templates. If there is no template that matches the manga you would like to create, you can manually enter the manuscript size.
Creating your manga manuscript
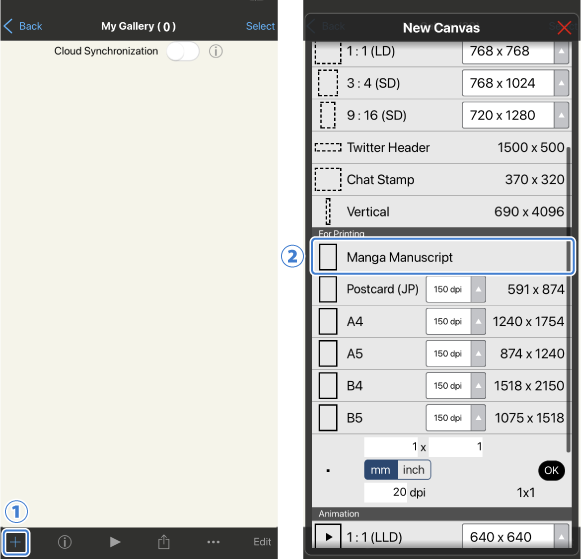
Open the Canvas Size Selection window from the ①[Create New Canvas button] and tap ②[Manga Manuscript].
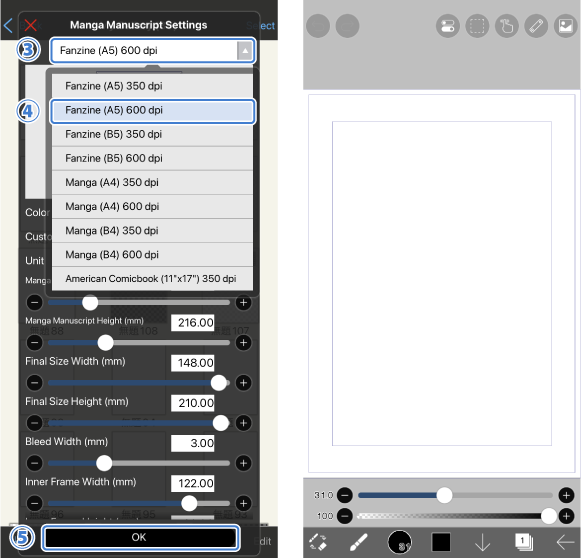
Tap ③[Manuscript Type] and select the manuscript type you wish to create from the list of templates. Let’s select ④[Fanzine (A5) 600 dpi] as an example. Tap ⑤[OK] to create a new Canvas with guidelines for the manga manuscript. “Resolution (dpi)" and "guidelines" will be covered in a later section.
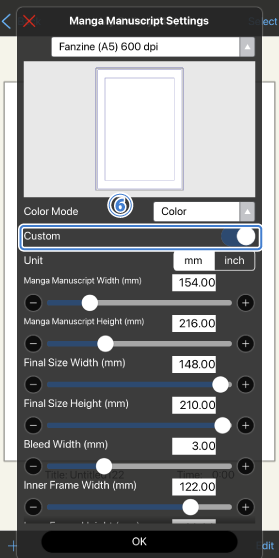
If there is no template that fits the manga you would like to create, select ⑥[Custom] and enter the size manually.
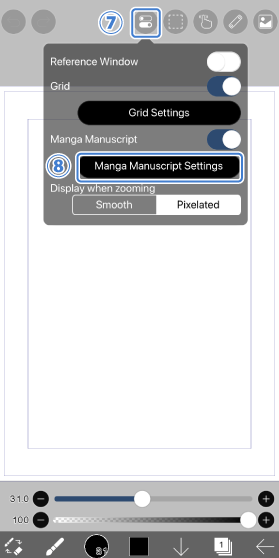
Manga manuscript settings can be changed from ⑦[View Menu]>⑧[Manga Manuscript Settings] on the Canvas screen.
Calculating your Canvas Size
You can calculate your Canvas Size (px) if you know the actual size (inch) and resolution (dpi).
The formula for obtaining Canvas Size (px) from the actual size (inch) and resolution (dpi) is
Actual Size (inch) × resolution (dpi) = Canvas Size (px)
*Canvas Size (px) is the size of the paper in digital terms, and actual size (inch) is the size of the paper that is actually printed (see the figure above).
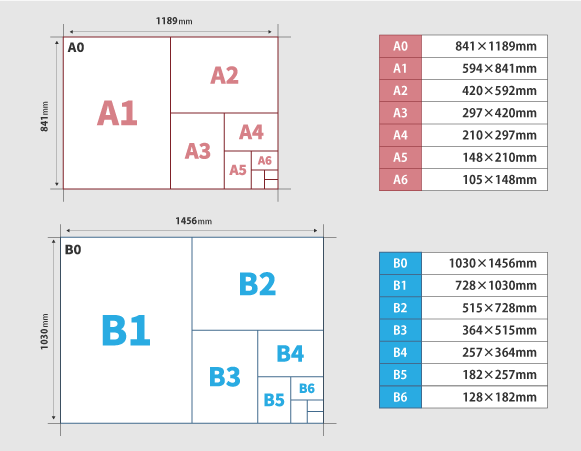
Suppose we want to print a manuscript on B5 paper (182mm x 257mm) with resolution 350dpi. In that case, the appropriate Canvas size can be determined using the following method.
First, convert mm to inch. 1 inch is 25.4 mm, so the conversion formula from mm to inch is
Actual size (mm) ÷ 25.4(mm/inch) = Actual size (inch)
Applying this formula to the previous dimensions,
Canvas width: 182(mm) ÷ 25.4(mm/inch) x 350(dpi) = 2507.874(px)
Canvas height: 257(mm) ÷ 25.4(mm/inch) x 350(dpi) = 3541.339(px)
As Canvas Size must be specified in integers, the above numbers are rounded to the nearest integer, resulting in a Canvas Size (px) of 2508 x 3541.
This conversion is slightly difficult to learn, but it is useful to keep in mind when creating printed materials.
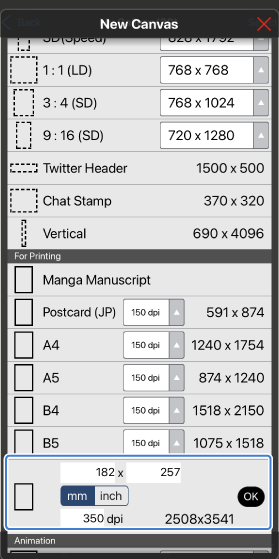
If you find the calculation difficult, enter the width and height (mm) in Specify by Print Size in the Canvas Size Selection window that appears after pressing Create New Canvas button in My Gallery to obtain the size in pixels.
Understanding the purpose of guidelines
In ibisPaint, the three guidelines are known as “inner frame”, “final size”, and “bleed width of the manga manuscript”. These guidelines will be explained one by one.
Inner frame
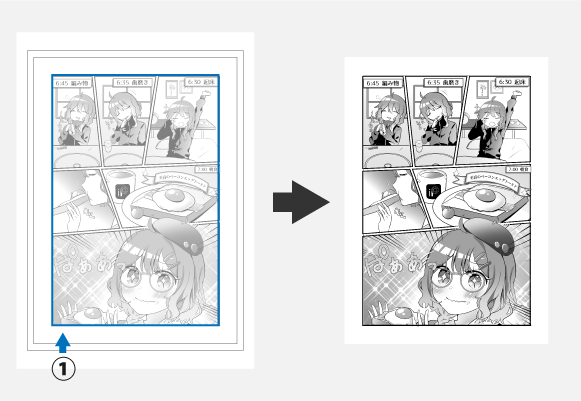
The innermost blue line in the image is the ①[inner frame]. Basically, your manga should be drawn within the inner frame. Try to keep the dialogue and important drawings (such as characters’ faces) within this inner frame.
Final size
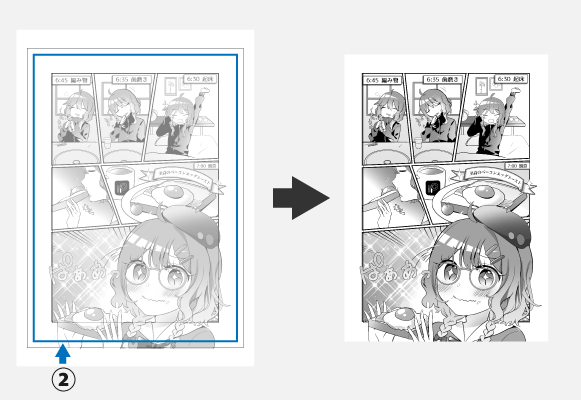
The green line in the image between inner frame and bleed width of the manga manuscript is the ②[final size]. This will be the edge of the actual book.
Bleed width of the manga manuscript
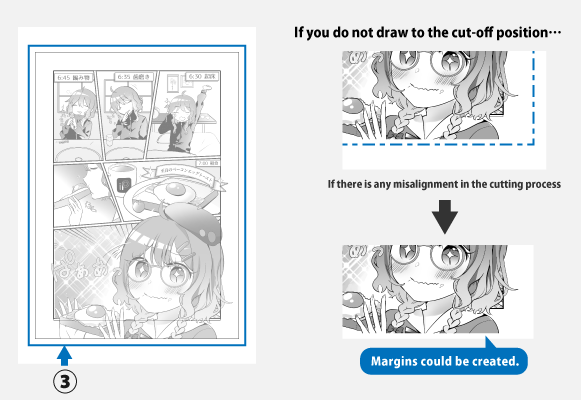
The outermost red line in the image is the ③[bleeding width of the manga manuscript]. You can create dynamic drawings by intentionally drawing beyond the inner frame. If you would like to do so, draw up to the bleed width of the manga manuscript instead of up to the final size, so that there will be no blank space in case of a discrepancy in the paper cutting process.
Learn about the three Color Modes
There are three Color Modes in ibisPaint: Color, Gray Scale, and Black & White.
Changing Color Mode
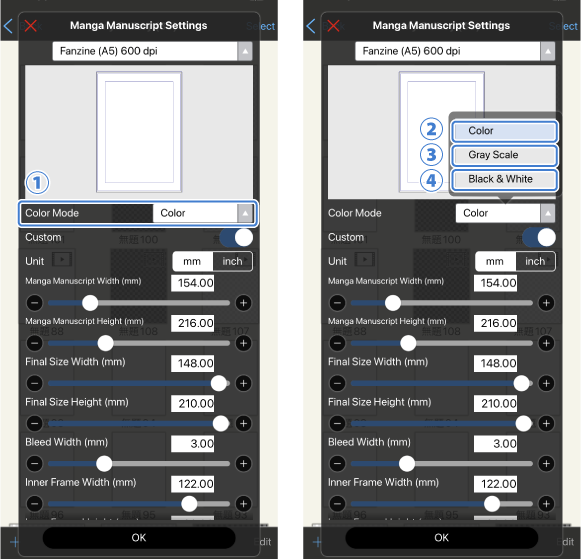
Tap ①[Color Mode] in the manga manuscript settings to select the Color Mode for your Canvas. You can choose from ②[Color], ③[Gray Scale], and ④[Black & White] Color Modes.
Differences between Color・Gray Scale・Black & White
Select "Color" if you are drawing full color manga, and select either "Gray Scale" or "Black & White" if you are drawing black and white manga. The difference between "Gray Scale" and "Black & White" is as follows.
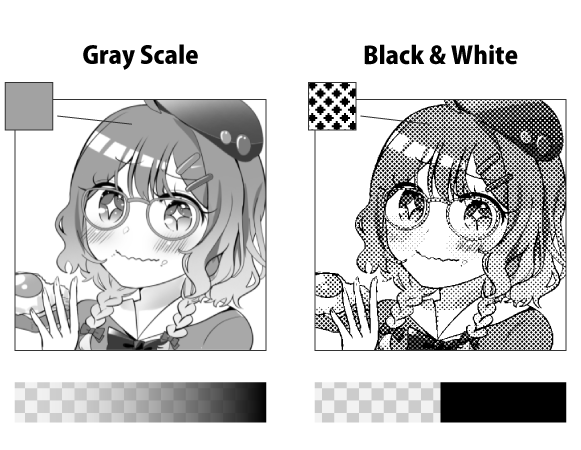
"Gray Scale" uses 256 colors ranging from white (colorless), gray, to black. It can be used to express color intensity with gradations.
Black & White uses only two colors: white (colorless) or black. Therefore, Screen Tone is used for gray areas. However, you must be careful when using Screen Tone to avoid the formation of moiré patterns. Moiré patterns will be covered in the following section.
What are moiré patterns?
When drawing black and white manga, you should be aware of moiré patterns forming in Screen Tone. Moiré patterns are unintended patterns formed due to a periodic shift when a regular periodic pattern is superimposed on another regular periodic pattern. The following are some of the causes of moiré patterns.
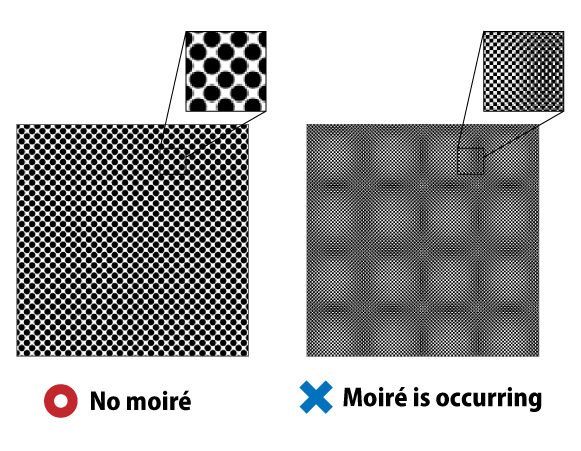
Causes of moiré pattern formation
<Cause 1>Wrong paper size
When creating a Canvas in the application, if Canvas size is different from the size of the paper used for printing, such as printing on B5 paper using a Canvas size for A5 paper, the image will be scaled, and moiré patterns will form.
<Cause 2>Anti-aliasing is applied to the Screen Tone’s halftone dots
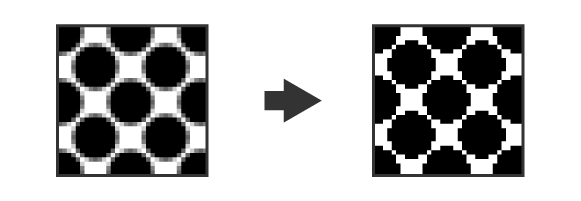
Anti-aliasing is the gray areas around shapes to make the outline of shapes seem smooth. When anti-aliasing is applied, the gray areas are blown out during output and the shape of the halftone dots will collapse, causing moiré patterns to form. Setting Color Mode to Black & White will prevent this problem.
<Cause 3>The Screen Tone is gray in color
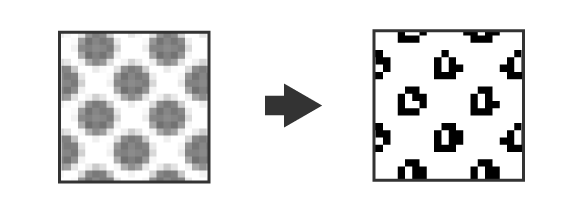
Moiré patterns also form when the Screen Tone itself is gray in color. The reason why the gray color is blown out is because printers can use only opaque or black ink in black and white printing. This problem will not occur if the Screen Tone feature is used.
<Cause 4>The background color of Screen Tone is gray
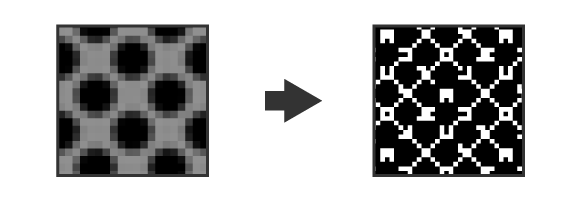
Moiré patterns form when the Screen Tone is overlaid on a gray fill. Screen Tone is usually used in Black & White, but if you would like to use Screen Tone in Gray Scale, be careful that the gray fill and Screen Tone do not overlap. This problem will not occur if the Screen Tone feature is used.
<Cause 5>Improperly shaped Screen Tone
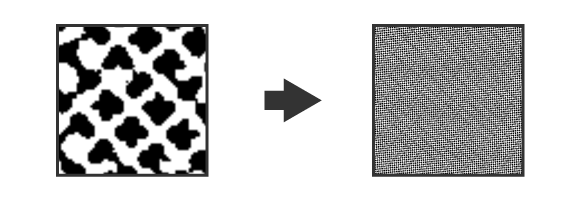
Moiré patterns can form if the Screen Tone is improperly shaped. Normally, if the Screen Tone Layer is not Rasterized, the Screen Tone shape will not be affected even if it is scaled. If you wish to scale a placed Screen Tone, make sure that the Screen Tone Layer is not Rasterized. Note that Screen Tone in Material tool is Rasterized, so do not scale it when using it.
Frequently asked questions about moiré patterns
<Q1>What should I do to avoid moiré patterns in my manuscript?
A Screen Tone that has not been Rasterized will not turn gray or change shape when scaled. Therefore, we recommend that you do not Rasterize your Screen Tone if possible. Also, make sure that the Color Mode of the manuscript is set to Black & White before printing.
<Q2>If moiré patterns form on the screen, will they also form on the printed manuscript?
Even if moiré patterns form on the screen, it does not directly affect printing. Keep in mind that moiré patterns that form on the screen and moiré patterns that form during printing are caused by different factors.
<Q3>How do I avoid moiré patterns from forming on the screen?
As long as you are scaling the Canvas (especially when scaling down), it is inevitable that moiré patterns will form on the screen. For example, when posting a manga that uses Screen Tone on the Internet, creating an illustration in the Canvas that matches the size to be posted will prevent the formation of moiré patterns. However, it is impossible to adjust the screen size and image size so that moiré patterns do not occur on all viewers' devices, since the screen size and image size varies depending on the type of device and the specifications of the social networking service, etc. to which you are posting. If you want to minimize the formation moiré patterns, we recommend using Screen Tone with larger dots, such as Dot L12 or Dot L16.
What is resolution (dpi)?
Resolution (dpi) stands for dots per inch, a number that indicates how many dots are displayed in a width of one inch (25.4 mm). Pixels, which we call "pixels" on the screen, are called "dots" on the printing press.
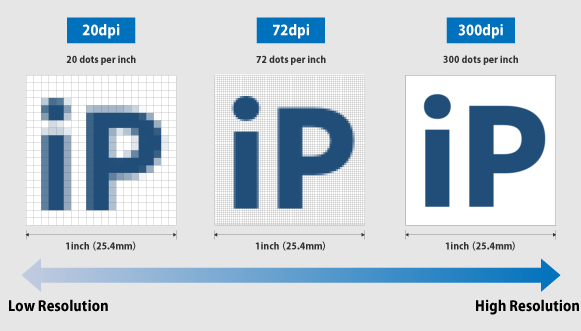
What is dpi in printing?
The resolution (dpi) here is related to printing and is different from the image resolution related to displaying an image on a smartphone screen or monitor. Therefore, when displayed on screen, resolution (dpi) does not affect image quality whether its value is 1 or 9999. On screen, the larger the Canvas size, the better the image quality.
Let's compare a 72 dpi resolution illustration and a 350 dpi resolution illustration created with the same Canvas size.
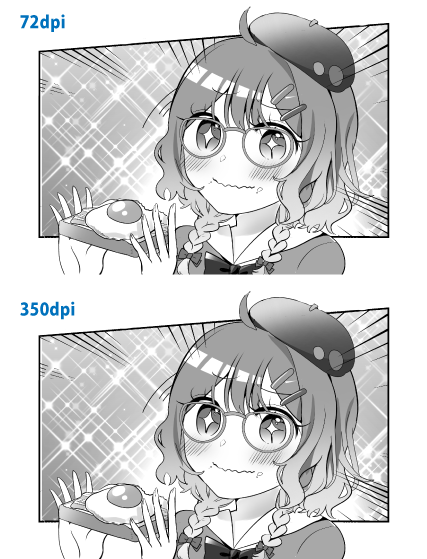
The comparison shows that the image quality is the same regardless of resolution for on-screen viewing.
How to select a suitable resolution (dpi)?
In general, "350 dpi" is recommended for full color, and "600 dpi" or higher is recommended for Gray Scale and Black & White. Jagged edges are more obvious in Gray Scale and Black & White illustrations than in full color illustrations. A higher resolution is recommended for Gray Scale and Black & White compared to full color because a higher resolution can make the jagged edges appear smoother.
Things to keep in mind to create manuscripts without moiré patterns
Moiré patterns, explained in the previous chapter, is also closely related to resolution (dpi). In physical terms, moiré patterns form when the ratio of the wavelengths of two periodic functions is not an integer. Thus, moiré patterns form when the size of a single printed pixel in an image is not an integer multiple of the size of the dot on the printer.
The resolution of most printers is 1200 dpi. Therefore, if you create a Canvas with a 1200 dpi setting, the ratio of pixel size to dot size is 1:1. When the Canvas is 600 dpi, the ratio is 2:1; when the Canvas is 400 dpi, the ratio is 3:1; at 300 dpi, the ratio is 4:1; at 200 dpi, the ratio is 6:1; and at 150 dpi, the ratio is 8:1. If the Canvas is created at these dpi values and the correct paper size is used, moiré patterns will not form.
This is why 600 dpi is recommended for Black & White manuscripts (manuscripts using Screen Tone). However, as mentioned above, moiré patterns will not form only when the correct paper size is used.
For example, if you create a manuscript at 600 dpi and B4 paper size, save it as a PNG file, and then scale it down it to A4 and print it, moiré patterns will form. In this case, to prevent moiré patterns from occurring, it is a good idea to recreate the manuscript to fit A4 paper. If a Screen Tone is applied using the screen Tone feature, it is not rasterized, so even if the paper size is changed using Tool Select button>Canvas>Resize, the Dot size will not be scaled, and moiré patterns will not form.
Chapter
-
 01.Introduction
 -
 02.Start Creating an Artwork
 -
 03.Toolbar and Tool Selection
 -
 04.Do Your Draft Sketch by Hand
 -
 05.About Layers
 -
 06.Let's Trace
 -
 07.Undo and Eraser
 -
 08.Fine Tuning Using the Lasso tool
 -
 09.Check by Reflecting Horizontally
 -
 10.Select Colors in the Color window
 -
 11.Use Color Fill for the Undercoat
 -
 12.Turn Clipping On
 -
 13.Making a Gradation (Shading)
 -
 14.Select a color from the canvas or layer
 -
 15.Set the Time before Quick Eyedropper Starts
 -
 16.Create Highlights and Shadows
 -
 17.Paste a Texture
 -
 18.Let's Merge Layers
 -
 19.Sign Your Artwork
 -
 20.View Your Artwork
 -
 21.Post Your Artwork
 -
 22.Share Your Artwork
 -
 23.Open your ibisPaint data in Clip Studio Paint
 -
 24.Premium Membership / Ad Removal Upgrade (for iPhone/iPad, Android)
 -
 25.Premium Membership / Pro Upgrade (for Windows, Mac)
 -
 26.Smart Features and Smart Credits
 -
 27.Synchronizing the artworks on your device with Cloud Storage
 -
 28.Save the past state of an Artwork as an IPV file
 -
 29.Rearrange artworks
 -
 30.Artworks Folder Feature
 -
 31.Make custom brush
 -
 32.Create Original Brush Patterns
 -
 33.Installing and Exporting the Custom Brush
 -
 34.Release a Custom Brush to the Online Gallery
 -
 35.Brush Export and Import
 -
 36.Search For Brushes
 -
 37.Display images to use as reference
 -
 38.Add Color to the Analog Image using Multiply
 -
 39.Stabilizer
 -
 40.Layer: Clipping is convenient
 -
 41.Layer: Changing the color with Alpha Lock
 -
 42.Layer: Let's try using Screen Tone
 -
 43.Layer: Selection Layer
 -
 44.Layer: Save Layer as Transparent PNG command
 -
 45.Layer: Naming your layers to manage them
 -
 46.Layer: Rasterize
 -
 47.Layer: Layer Folders
 -
 48.Layer: Folder Move/Transform
 -
 49.Layer: Add Layer from Canvas
 -
 50.Vector Layer
 -
 51.How to edit a brush shape
 -
 52.Contents Layer Selection
 -
 53.Apply Canvas Papers to your canvas
 -
 54.Display Grid on the Canvas
 -
 55.Export an Artwork (Save)
 -
 56.Export in CMYK (Save)
 -
 57.Save canvas as Transparent PNG
 -
 58.Make the background transparent with Eraser Bucket
 -
 59.Bucket Tool: Surrounding Fill / Surrounding Eraser
 -
 60.Putting texture to the floor with Perspective Form
 -
 61.Skirt with Mesh Form
 -
 62.Entering text with Text tool
 -
 63.Creating manga with Frame Divider tool
 -
 64.Enlarging the canvas with Canvas Size
 -
 65.Cutting off the canvas with Trim
 -
 66.Create a Manga Manuscript for Printing
 -
 67.Canvas creation with resolution (dpi) specification
 -
 68.Changing image resolution with Resize
 -
 69.Change canvas Color Mode
 -
 70.Output High-Resolution Images with AI (Artificial Intelligence)
 -
 71.AI Disturbance
 -
 72.Texture with Material tool
 -
 73.Cut, Copy, Paste
 -
 74.Ruler: Straight Ruler
 -
 75.Ruler: Circular Ruler
 -
 76.Ruler: Elliptical Ruler
 -
 77.Ruler: Radial Ruler
 -
 78.Ruler: Mirror Ruler
 -
 79.Ruler: Kaleidoscope Ruler
 -
 80.Ruler: Array Ruler
 -
 81.Ruler: Perspective Array Ruler
 -
 82.Drawing Tool: Straight Line
 -
 83.Drawing Tool: Rectangle
 -
 84.Drawing Tool:Circle
 -
 85.Drawing Tool:Ellipse
 -
 86.Drawing Tool:Regular Polygon
 -
 87.Drawing Tool:Bezier Curve
 -
 88.Drawing Tool:Polyline
 -
 89.Drawing Tool:Fill
 -
 90.Selection Area tool: Color Range
 -
 91.Selection Area tool: Expand/Contract Selection Area
 -
 92.Special: Liquify Pen
 -
 93.Special: Lasso Fill
 -
 94.Special: Lasso Eraser
 -
 95.Special: Copy Pen
 -
 96.Filter (Adjust Color): Brightness & Contrast
 -
 97.Filter (Adjust Color): Tone Curve
 -
 98.Filter (Adjust Color): Hue Saturation Lightness
 -
 99.Filter (Adjust Color): Color Balance
 -
 100.Filter (Adjust Color): Extract Line Drawing
 -
 101.Filter (Adjust Color): Find Edges (Handwriting)
 -
 102.Filter (Adjust Color): Find Edges
 -
 103.Filter (Adjust Color): Change Drawing Color
 -
 104.Filter (Adjust Color): Mono Color
 -
 105.Filter (Adjust Color): Grayscale
 -
 106.Filter (Adjust Color): Black & White
 -
 107.Filter (Adjust Color): Posterize
 -
 108.Filter (Adjust Color): Invert Color
 -
 109.Filter (Adjust Color): Gradation Map
 -
 110.Filter (Adjust Color): Levels Adjustment
 -
 111.Filter (Adjust Color): Replace Color
 -
 112.Filter (Blur): Gaussian Blur
 -
 113.Filter (Blur): Zooming Blur
 -
 114.Filter (Blur): Moving Blur
 -
 115.Filter (Blur):Spin Blur
 -
 116.Filter (Blur): Lens Blur
 -
 117.Filter (Blur): Mosaic
 -
 118.Filter (Blur): Unsharp Mask
 -
 119.Filter (Blur): Frosted Glass
 -
 120.Filter (Style): Stroke (Both)
 -
 121.Filter (Style): Stained Glass
 -
 122.Filter (Style): Wet Edge
 -
 123.Filter (Style): Glow (Inner)
 -
 124.Filter (Style): Bevel (Inner)
 -
 125.Filter (Style): Bevel (Outer)
 -
 126.Filter (Style): Emboss
 -
 127.Filter (Style): Relief
 -
 128.Filter (Style): Waterdrop (Rounded)
 -
 129.Filter (Style): Stroke (Outer)
 -
 130.Filter (Style): Glow (Outer)
 -
 131.Filter (Style): Satin
 -
 132.Filter (Style): Drop Shadow
 -
 133.Filter (Style): Extrude
 -
 134.Filter (Style): God Rays
 -
 135.Filter (Draw): Parallel Gradation
 -
 136.Filter (Draw): Concentric Gradation
 -
 137.Filter (Draw): Radial Line Gradation
 -
 138.Filter (Draw): Radial Line
 -
 139.Filter (Draw): Speed Line
 -
 140.Filter (Draw): Clouds
 -
 141.Filter (Draw): QR Code
 -
 142.Filter (Smart): Watercolor Filter
 -
 143.Filter (AI): Background Removal
 -
 144.Filter (Artistic): Anime Background
 -
 145.Filter (Artistic): Manga Background
 -
 146.Filter (Artistic): Chromatic Aberration (Color Shift, RGB Shift)
 -
 147.Filter (Artistic): Glitch
 -
 148.Filter (Artistic): Noise
 -
 149.Filter (Artistic): Retro Game
 -
 150.Filter (Artistic): Chrome
 -
 151.Filter (Artistic): Bloom
 -
 152.Filter (Artistic): Cross Filter
 -
 153.Filter (Artistic): Sheer
 -
 154.Filter (Pixelate): Pixelate Crystalize
 -
 155.Filter (Pixelate): Hexagonal Pixelate
 -
 156.Filter (Pixelate): Square Pixelate
 -
 157.Filter (Pixelate): Triangular Pixelate
 -
 158.Filter (Pixelate): Pointillize
 -
 159.Filter (Pixelate): Dots (Hexagonal)
 -
 160.Filter (Pixelate): Dots (Square)
 -
 161.Filter (Transform): Expansion
 -
 162.Filter (Transform): Fisheye Lens
 -
 163.Filter (Transform): Sphere Lens
 -
 164.Filter (Transform): Wave
 -
 165.Filter (Transform): Ripple
 -
 166.Filter (Transform): Twirl
 -
 167.Filter (Transform): Polar Coordinates
 -
 168.Filter (Frame): Table
 -
 169.Filter (Frame): Blur Frame
 -
 170.Filter (Movie): Rain
 -
 171.Adjustment Layer
 -
 172.Create an animation
 -
 173.Animation Feature: Video Mode
 -
 174.Animation Feature: Audio Tracks in Video Mode
 -
 175.Manga Function: Let's create a manga manuscript
 -
 176.Manga Function: Master the Manga creation tools
 -
 177.Manga Function: Make Use of Materials
 -
 178.Manga Function: Publishing and Printing your Manga
 -
 179.Changing Devices & File Transfers
 -
 180.Settings window details
 -
 181.Change the Background Color of the Canvas
 -
 182.Details of Brush Parameters
 -
 183.Bucket tool details
 -
 184.Layer Window Details
 -
 185.Transform tool details
 -
 186.Blend mode details
 -
 187.View Menu details
 -
 188.How to upload transparent PNG onto X
 -
 189.Importing and exporting Photoshop files (PSD)
 -
 190.Posting Multiple Pages of Comic to the Online Gallery
 -
 191.Gestures, Keyboard shortcuts (iOS,iPadOS,Android versions)
 -
 192.Gestures, Keyboard shortcuts (Windows Version)
 -
 193.Display a Crosshair Symbol When Hovering the Stylus Pen
 -
 194.Set Up Palm Rejection
 -
 195.Use a Promo Code
 -
 196.About ibisAccount: Creating an Account
 -
 197.About ibisAccount: Log In
 -
 198.About ibisAccount: Delete Your Account
- Artwork Rankings

- Artist Rankings
- Official accounts


