Tutorials
173. Manga Function: Master the Manga creation tools
- Manga Function: Let's create a manga manuscript
- Manga Function: Master the Manga creation tools
- Manga Function: Make Use of Materials
- Manga Function: Publishing and Printing your Manga
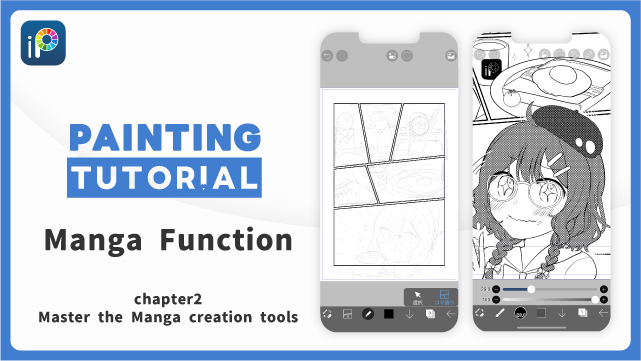
This chapter introduces useful tools that are essential for producing Manga. The “Frame Divider tool”, which allows you to divide frames with one finger, the “Text tool”, which allows you to choose a font, and “Screen Tone”, which can be pasted by painting, are just some of the functions necessary for Manga production that ibisPaint offers.
Frame Divider tool
Using the Frame Divider tool, you can easily create frames that are essential for Manga production.
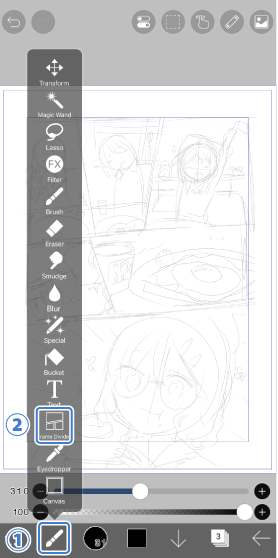
Open the ①[Tool Selection window], and select ②[Frame Divider tool].

Tap on the screen. Tap on ③[Add Frame] once it appears.
④[Horizontal Space] …You can adjust the margins on both the left and right
⑤[Vertical Space] … You can adjust the margins on both the top and bottom
⑥[Frame Thickness] … You can adjust the thickness of the frame
Once you are done adjusting, tap on ⑦[✓] to finish.
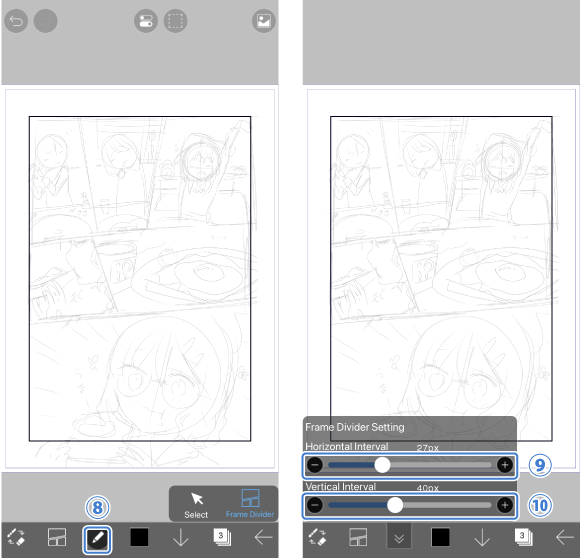
Now that the overall frame has been added, the next step is to divide it up. Adjust the spacing between the frames before dividing them. Tap the ⑧[Edit button].
⑨[Horizontal Interval]…Adjusting the spacing when dividing frames horizontally
⑩[Vertical Interval]…Adjusting the spacing when dividing frames vertically
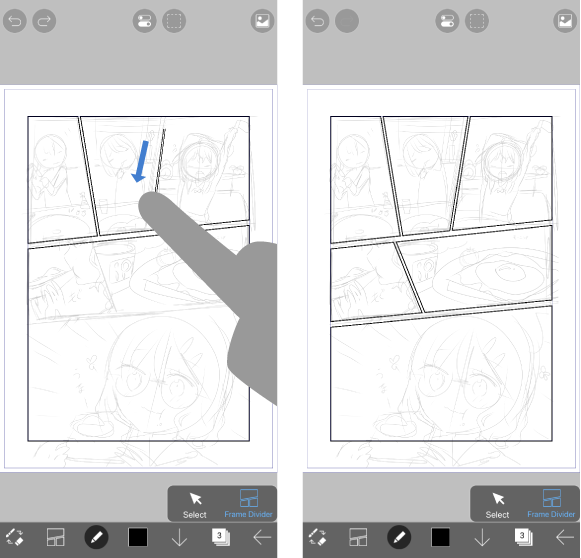
Divide the frames along the frames of your draft. You are done when all the frames have been divided.
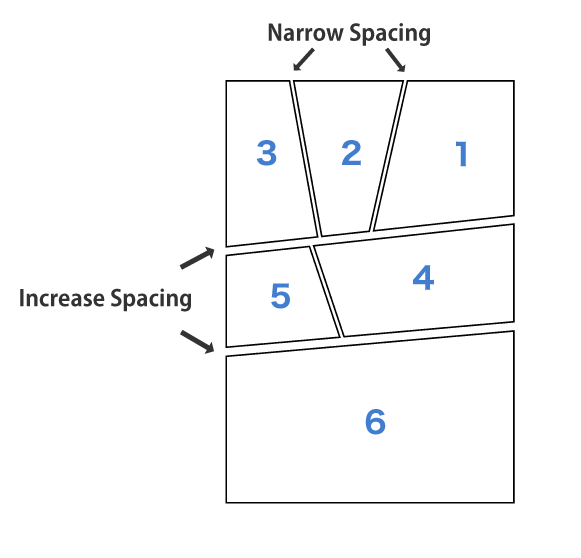
Manga is read horizontally, then vertically, so we recommend narrowing the space between horizontal frames and widening the space between vertical frames to make it easier for the reader to read.
Screen Tone
You can easily paste the Screen Tones used in Manga. By pasting Screen Tones, you can instantly improve the appearance of your Manga.
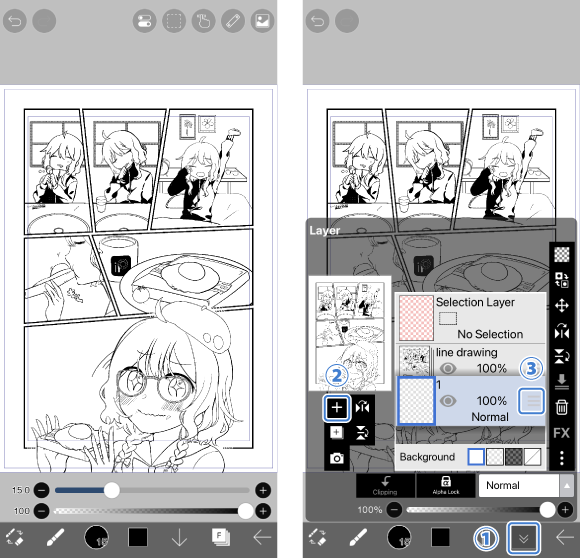
Prepare the line drawing which you want to paste the Screen Tone onto. Open the ①[Layer window], Add ②[a new layer], Drag the ③[current layer] underneath the line drawing.
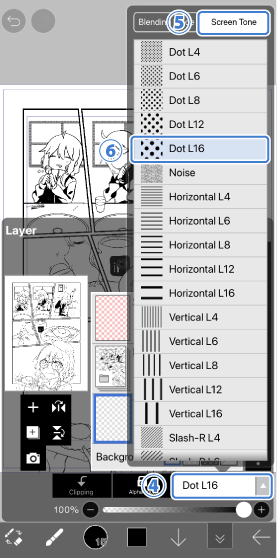
Select ④[Blending Mode] and tap ⑤[Screen Tone]. The Screen Tones will be displayed in a list, so select the one you want to use. Let’s use ⑥[Dot L16] as an example. (For Dot below Dot L8, Dot is fine and may smudge when printed. Therefore, for a printed draft, Dot L12 or Dot L16 is recommended.)
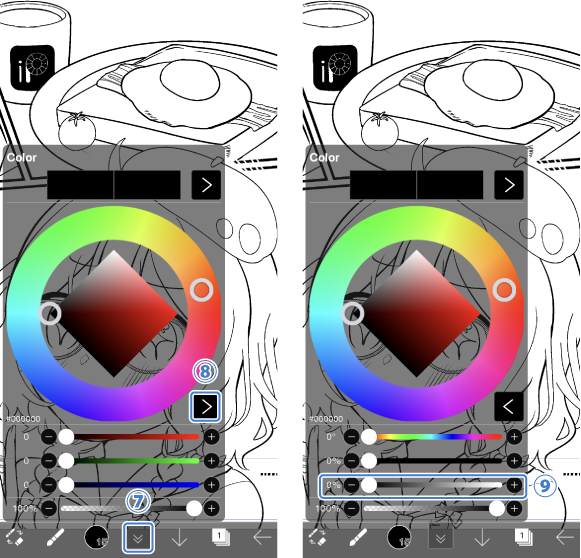
The density of the Screen Tone can be changed by changing the color density. Open ⑦[Color Palette] and tap the ⑧[HSB/RGB Toggle button]. Set it to black and move the ⑨[Brightness Slider]. In this example, we set it to 58%.
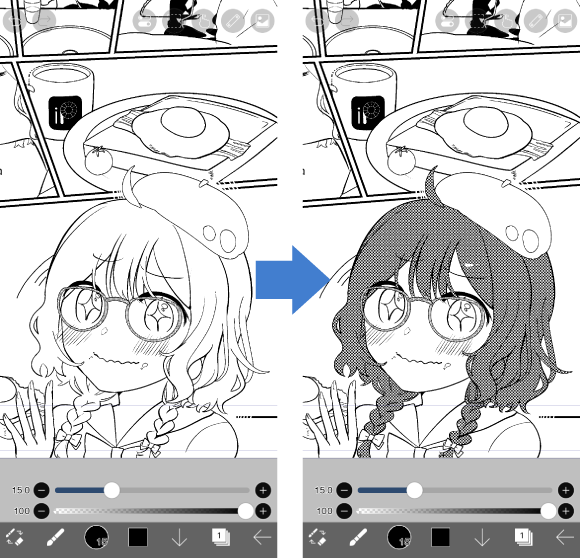
Paste the Screen Tone on the new layer created earlier.

We want the hat to be a little darker, so let’s set the ⑩[Brightness Slider] to 32% and paint it in.
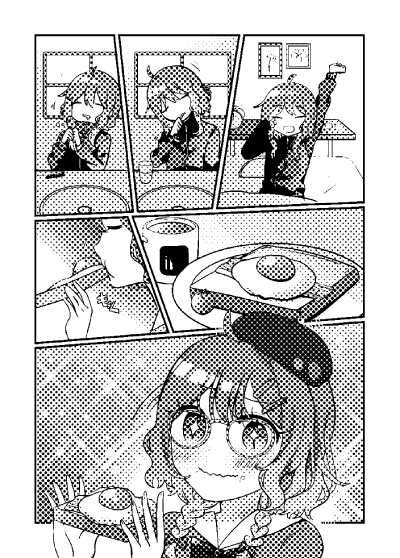
You are done once you paste the Screen Tone all over.
Radial Line Filter
This is a Filter that allows you to easily create Radial Lines to add impact to the frames of your Manga.
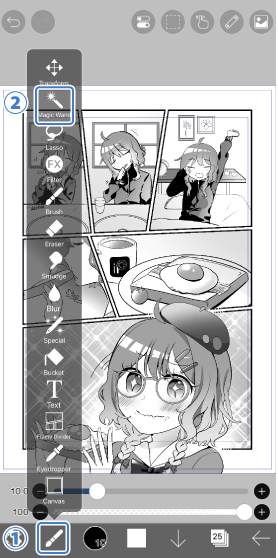
Open the ①[Tool Selection Window] and select the ②[Magic Wand tool].

Tap ③[% button]. Tap ④[Reset] to reset to the default value. Tap ⑤[Specific Layer] and choose the layer of your ⑥[Layer with drawn frames].
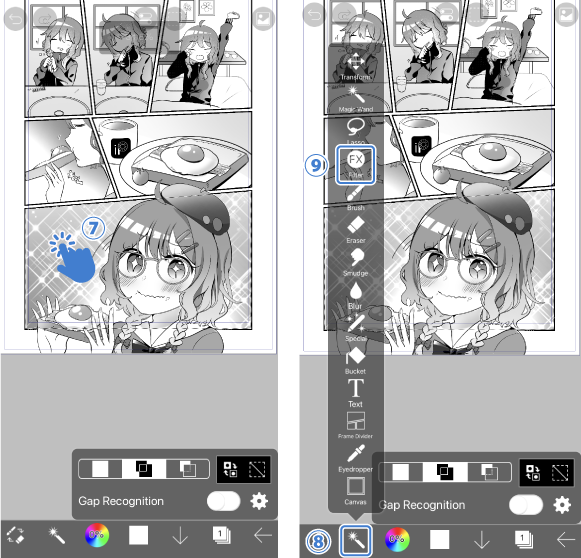
⑦[Tap] inside the frame where you want to insert Radial Lines. Since I set the frame's layer to Specific Layer, only the frame is selected. Select ⑨[Filter] from the ⑧[Tool Selection Window].

Select ⑪[Radial Line] from ⑩[Draw]. Drag the ⑫[Knob] to adjust the position. This time, We wanted to draw Radial Lines toward the center of the frame, so we moved the Knob to focus on the frame. Please adjust the shape of the Radial Lines using the ⑬[Slider]. When you have finished adjusting, tap ⑭[✓] to return to the Canvas.

Radial Lines were applied to create an impressive frame.
Click here for a video of the Frame Radial Line Filter
Click here for details on the Frame Radial Line Filter
Speed Line Filter
This is a Filter that allows you to easily create Speed Lines that give a sense of speed and dynamism to the frames of your Manga.
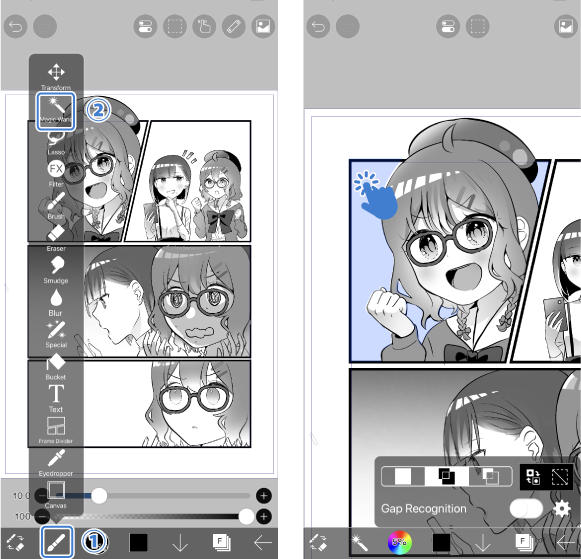
Open the ①[Tool Selection Window] and select the ②[Magic Wand tool]. Use the Magic Wand tool to select only the character's background. (For clarity, the selected area is filled in blue.)
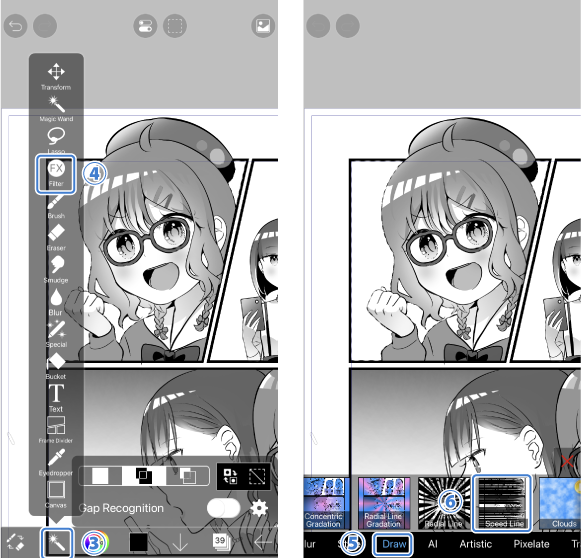
Once you have made your selection, select ④[Filter] from the ③[Tool Selection Window]. Then, select ⑥[Speed Line] from ⑤[Draw].

You can change the position of the Speed Lines by dragging the ⑦[Knob]. Please adjust the shape of the Speed Lines using the ⑧[Slider]. When you have finished adjusting, tap the ⑨[OK button] to return to the Canvas.

The Speed Lines have created a dynamic frame.
Outline Pen
You can easily create a Manga Balloon using the Outline Pen.

Customize Outline (Fade) a little to create Manga Balloon Pen and register it as a Custom Brush. Find ②[Outline (Fade)]in the ①[Brush Window] and tap ③[+].
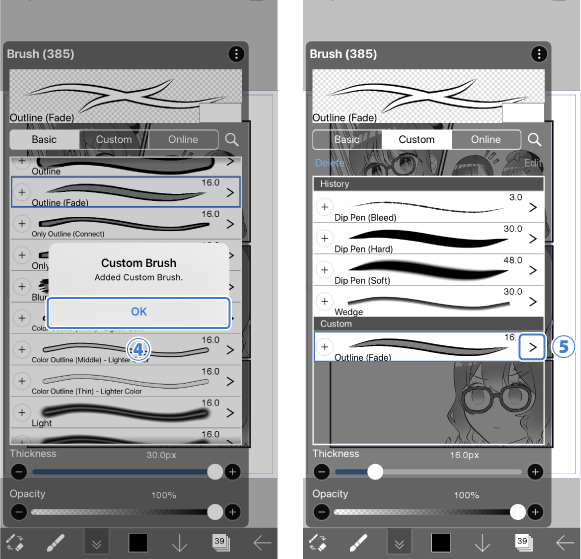
The selected Brush will be added to Custom Brush, so tap ④[OK]. Tap ⑤[>] to customize the Brush.
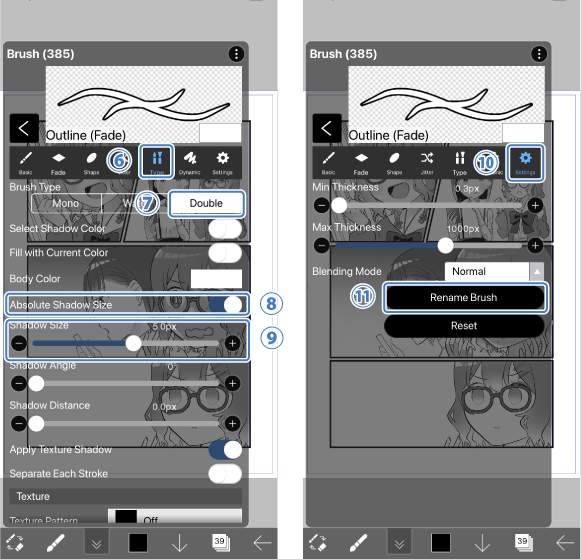
From ⑥[Type], select ⑦[Double]. Enable ⑧[Absolute Shadow Size] and choose the ⑨[Shadow Size]. We recommend around 5px. This time, we will register it as 5px. Next, rename the Brush. From ⑩[Settings], select ⑪[Rename Brush].
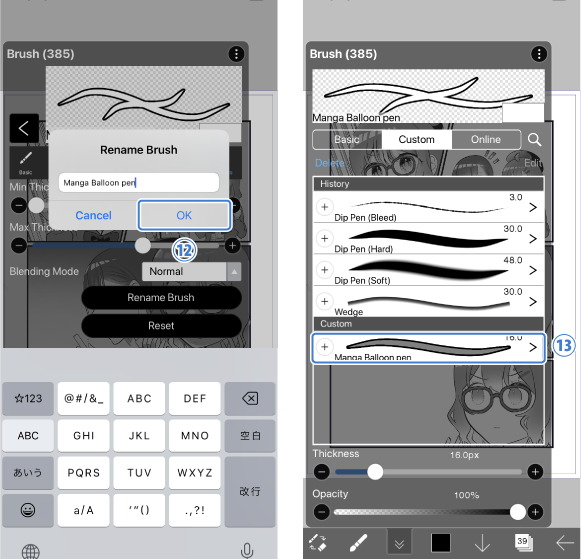
Enter the brush name. This time, as an example, we entered “Manga Balloon Pen”. Once you have decided a name, select ⑫[OK]. Now that we have created a Custom Brush, let's draw Manga Balloon using the ⑬[Manga Balloon Pen].

Manga Balloons have been drawn easily. If you feel that the borders are too thin or too thick, adjust the pixels (px) of “Shadow Size”.
Elliptical Ruler
By combining the Elliptical Ruler with the Brush Tool’s Wedge and Flash, you can easily create jagged Manga Balloons.

From the ①[Ruler tool], select ②[Elliptical Ruler].
Drag ③…change the width.
Drag ④…change the position.
Drag ⑤…change the height.
Drag ⑥…change the angle.

Once you have decided on the shape of the ellipse, open the ⑦[Brush Window]. This time, ⑧[Wedge] is selected as an example. After selecting the brush, draw a circle counterclockwise.
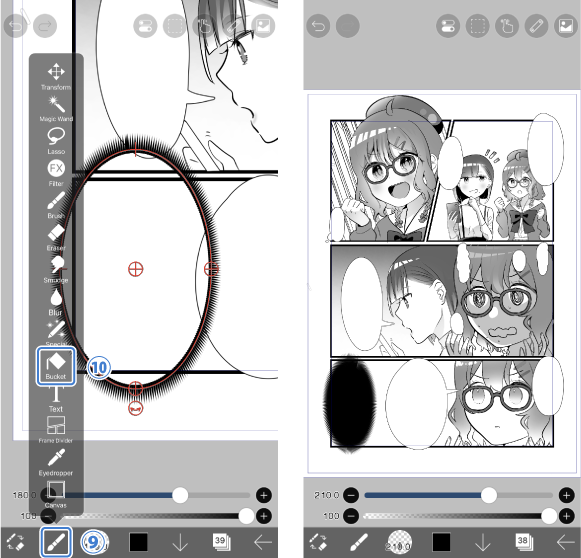
Open the ⑨[Tool Selection Window], select the ⑩[Bucket Tool], fill in the center, and it’s done.
Text Tool
You can easily add words using the Text Tool.
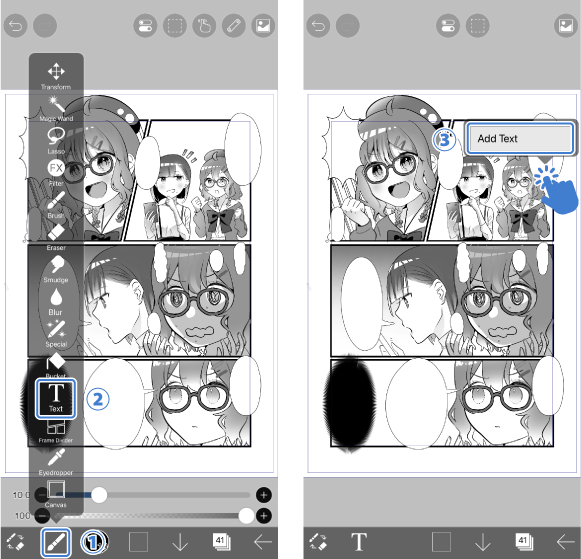
From the ①[Tool Selection window], select ②[Text Tool]. When you tap on the screen, ③[Add Text] will be displayed, so tap it.
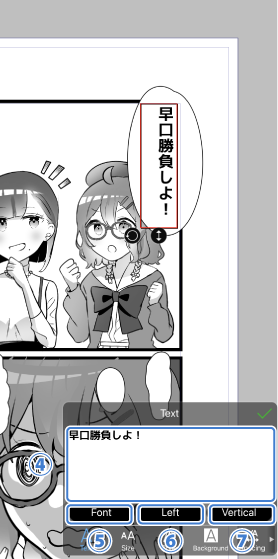
④You can enter characters in the blank field.
⑤You can choose the font.
⑥Tap to switch between [Left], [Center], and [Right].
⑦Tap to switch between [Vertical] and [Horizontal].
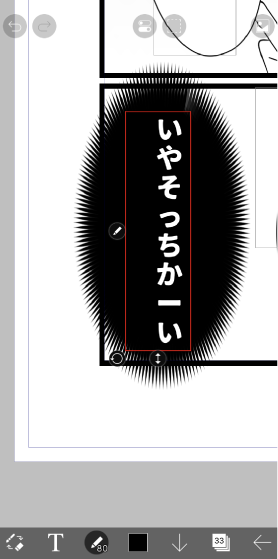
In the case of Vertical, depending on the font, long vowels in some languages may appear horizontal instead of vertical, as shown in the image above. This occurs when the font does not possess vertical writing information, so please try selecting a different font.

By adding text, it’s getting closer to completion.
Manga Background Filter
You can use the Manga Background Filter to process photos into a Manga-like background.

Prepare the image you want to use as the background of your Manga. Open the ①[Tool Selection Window] and select the ②[Filter].
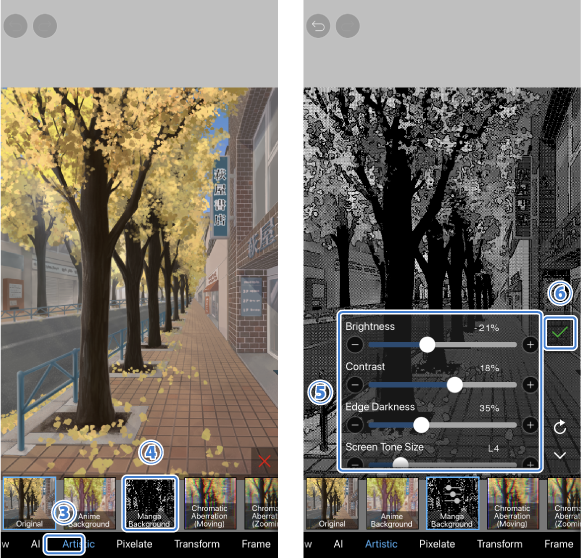
Select ④[Manga Background] from ③[Artistic]. Drag the ⑤[Slider] left and right to adjust the Contrast, Edge Darkness, Screen Tone Size, etc. When you have finished adjusting, tap the ⑥[OK button] to return to the Canvas.
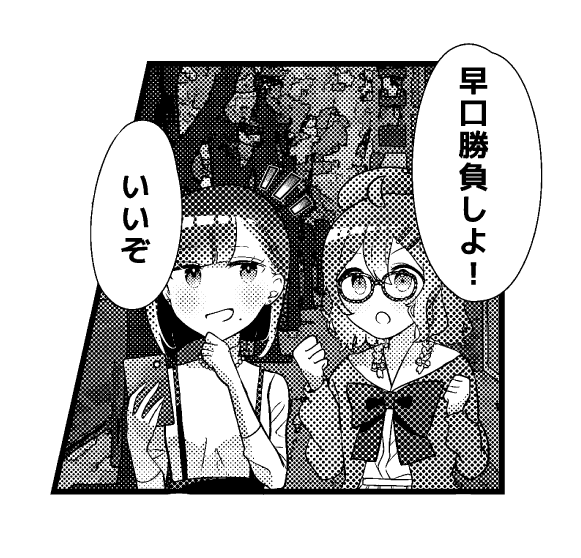
Place the background on the Manga frame and you are done. Even if you cannot draw backgrounds, you can use backgrounds created with this Filter in your Manga to instantly improve the level of completion.
Click here for a video of the Manga Background Filter
Click here for details on the Manga Background Filter
Perspective Array Ruler
The Perspective Array Ruler allows you to choose between One-point perspective, Two-point perspective, and Three-point perspective for an accurate perspective when drawing. This time, we will use the Perspective Array Ruler to draw a simple rectangular box in each perspective drawing method.
First, we will briefly introduce how to use the Perspective Array Ruler.
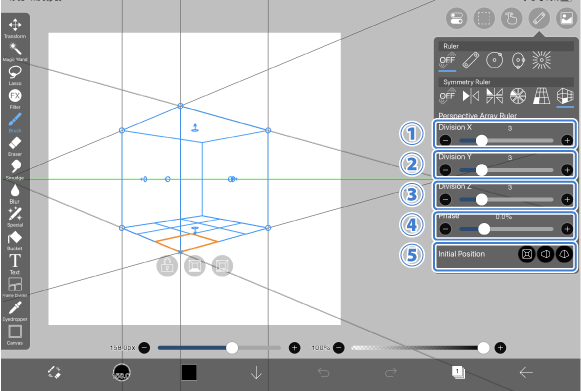
①[Division X]…Number of horizontal divisions
②[Division Y]…Number of divisions in depth
③[Division Z]…Number of vertical divisions
④[Phase]…Difference from the initial placement
⑤[Initial Position]…Selection of the perspective drawing method
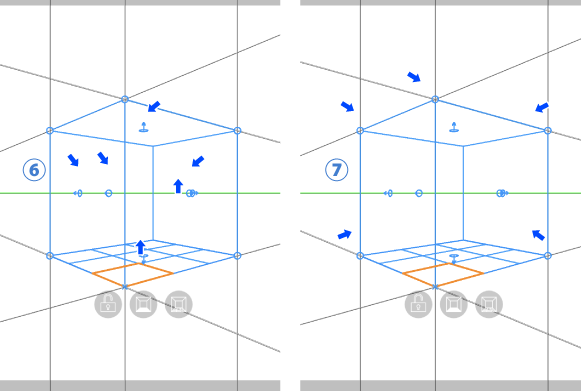
⑥[Face knob]…Adjust the position of the face by dragging
⑦[Vertex knob]…Freely transform the perspective by dragging
Please note that moving the Vertex knob may change the perspective drawing method specified with the Initial Position. If you want to return it to the original position, you can do so from Initial Position.

⑧[Lock button]…Makes the Perspective Array Ruler unable to be moved or transformed
⑨[Face Selection button]…Changes the reference face
⑩[Array Selection button]…Changes the work cell duplication destination
Now, let's draw a simple box using the Perspective Array Ruler.
Draw a box with One-point perspective
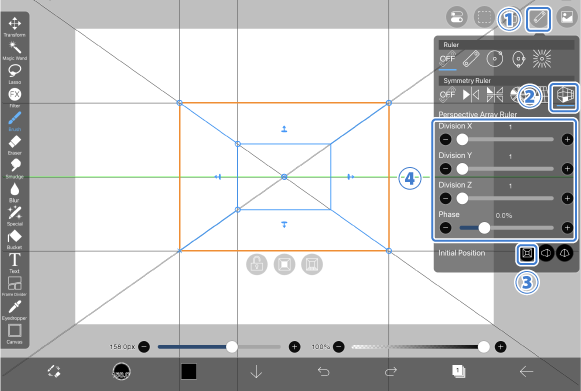
Select the ②[Perspective Array Ruler] from the ①[Ruler Tool]. From Initial Position, select the leftmost ③[One-point perspective]. The initial number of divisions is 3, but since we are drawing a box this time, set all ④[Division] except Phase to 1.
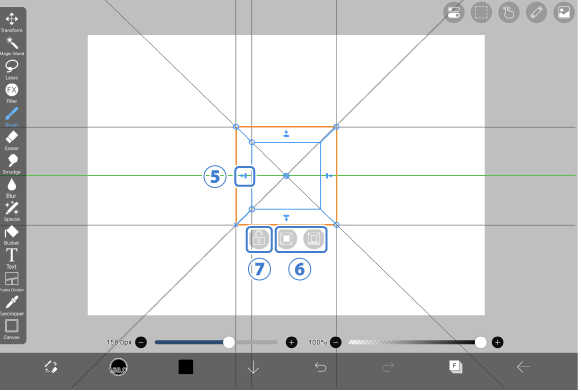
To draw a rectangle viewed from the front, first, drag the ⑤[Face knob] to decide the size of the rectangle. This time, we will draw it in a shape that is close to a square. Tap the ⑥[Face Selection button] to set the face to the front. Once you have decided on the shape, tap the ⑦[Lock button] to lock the settings of the Perspective Array Ruler.
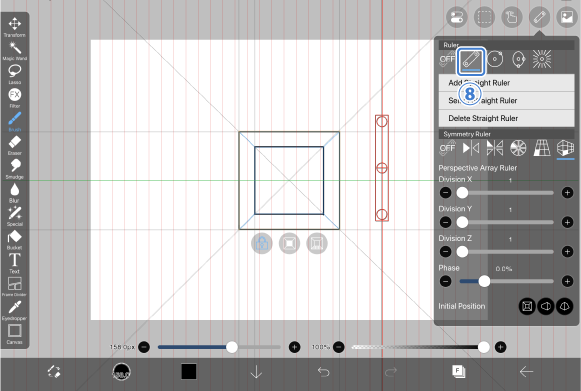
Draw the front face and the face that is the farthest in the back. Select ⑧[Straight Ruler] from the Ruler Tool. Draw a rectangle along the lines of the Perspective Array Ruler.
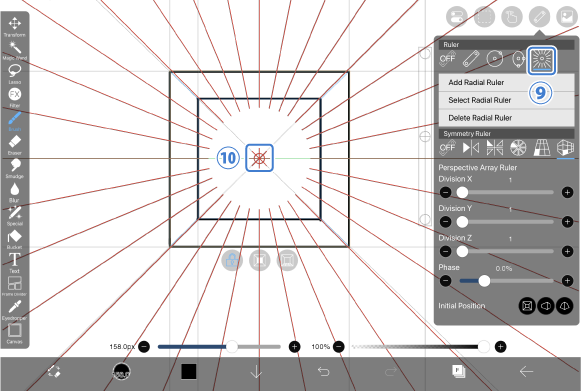
Now that we have drawn the front face and the farthest face, next, we will draw the depth. Select the ⑨[Radial Ruler] from the Ruler Tool. Place the Radial Ruler at the ⑩[vanishing point].
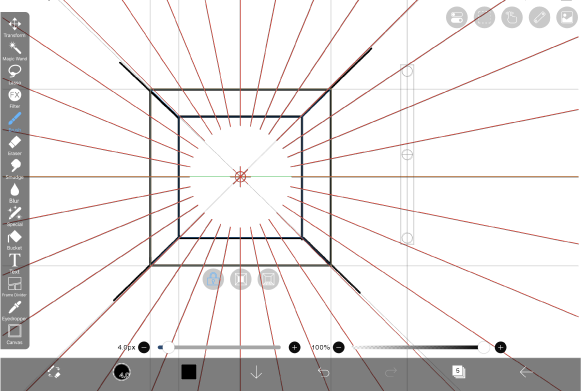
Draw lines connecting the corners of the front face and the farthest face. At this time, it is recommended to draw on a separate layer from the layer on which you drew the front face and the farthest face, as this will make it easier to erase the intersecting lines later.
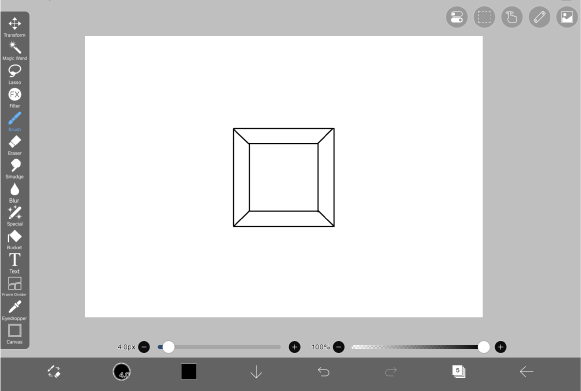
Finish up by erasing the extra lines.
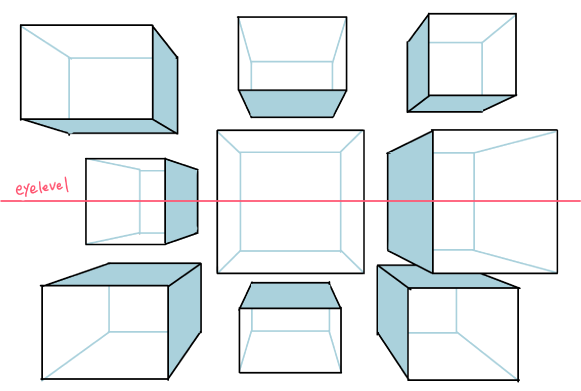
You can use this procedure to draw boxes of various angles, shapes, and sizes. Be sure to draw a lot to get a feel for it.
Draw a box with Two-point perspective

Select the ②[Perspective Array Ruler] from the ①[Ruler Tool]. From Initial Position, select ③[Two-point perspective] in the middle. This time as well, set all ④[Division] except Phase to 1.
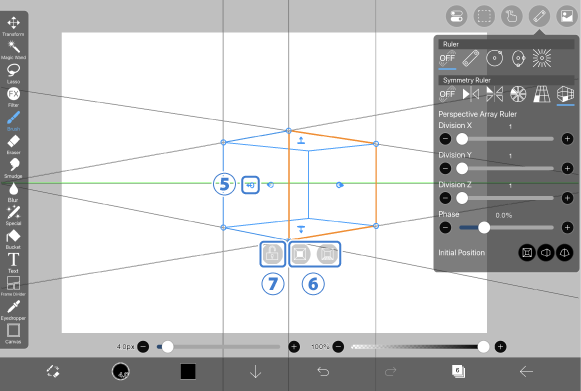
Drag the ⑤[Face knob] to decide the size of the rectangle. The box we will draw this time is facing right, so if you set it to face right with the ⑥[Face Selection button], you will be able to trace the cuboid neatly. Once you have decided on the shape, tap the ⑦[Lock button] to lock the settings of the Perspective Array Ruler.

Draw vertical lines on the Canvas. To do so, select the ⑧[Straight Ruler] from the Ruler Tool. Draw vertical lines along the lines of the Perspective Array Ruler.

Next, place the ⑨[Radial Ruler] at the vanishing point. Select the Ruler Tool from the Ruler Tool and align it with the ⑩[vanishing points].

Since the box we are drawing this time is a Two-point perspective, there are two vanishing points. Select ⑪[Add Radial Ruler] and align the Radial Ruler with ⑫[the other vanishing point].
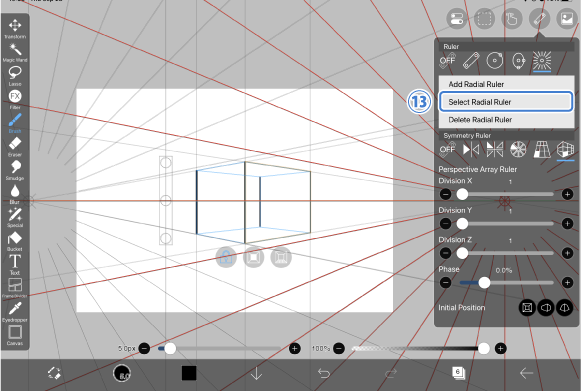
Once you have positioned the Radial Ruler, draw diagonal lines along the perspective lines. You can select the Radial Ruler you want to use from ⑬[Select Radial Ruler].
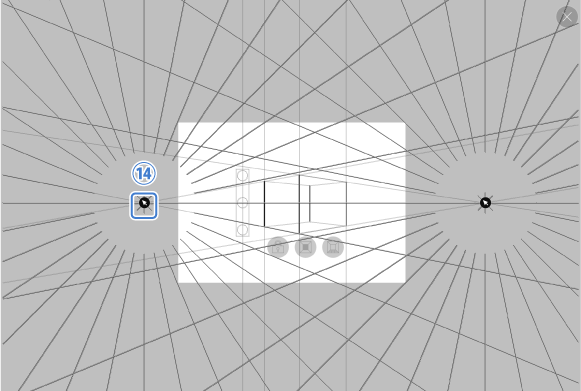
As shown in the image above, the screen for selecting a ruler will appear, so you can switch between them by selecting ⑭[the ruler you want to use]. Switch the ruler according to the direction of the line you want to draw.
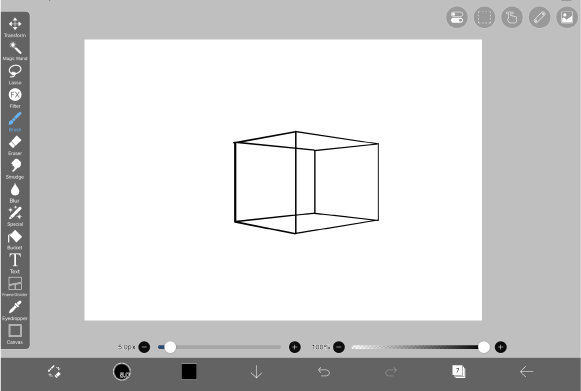
Once you have drawn all the lines, it is completed.
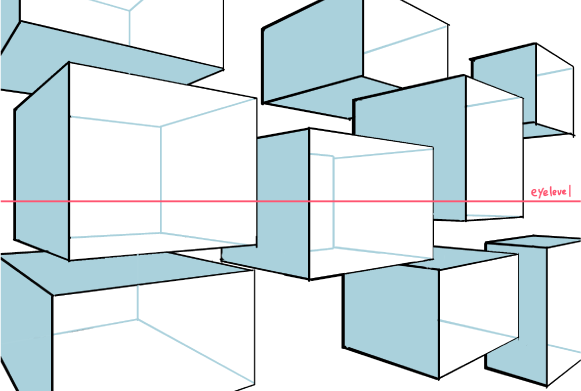
If you apply this method, you will be able to draw backgrounds with a three-dimensional effect.
Draw a box with Three-point perspective
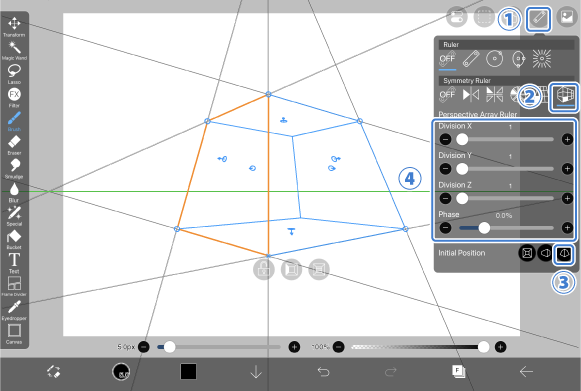
Select the ②[Perspective Array Ruler] from the ①[Ruler Tool]. From Initial Position, select the rightmost ③[Three-point perspective]. Set all ④[Division] other than Phase to 1.
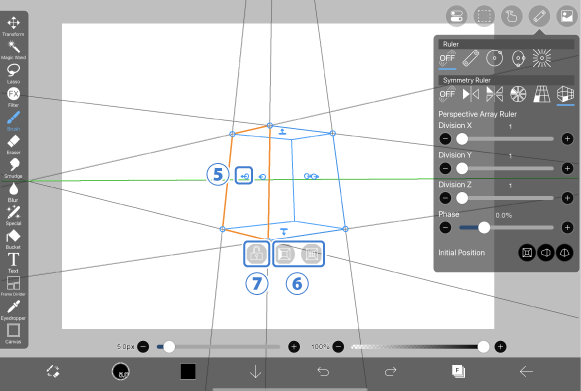
Drag the ⑤[Face knob] to decide the size of the rectangle. The box we will draw this time is facing left, so use the ⑥[Face Selection button] to set it to the left. Once you have decided on the shape, tap the ⑦[Lock button] to lock the settings of the Perspective Array Ruler.

Next, place the Radial Ruler at the vanishing point. Select the ⑧[Radial Ruler] from the Ruler Tool and align it with the ⑨[vanishing points].
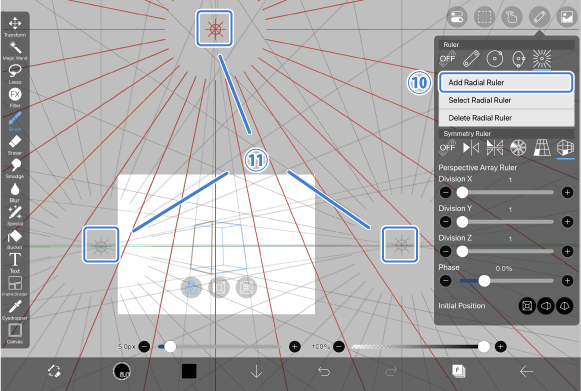
Three-point perspective has three vanishing points, so add two more rulers with ⑩[Add Radial Ruler] and place them at ⑪[the three vanishing points] as shown above.

While switching to the ruler you want to use with ⑫[Select Radial Ruler], trace the guides of the Perspective Array Ruler.
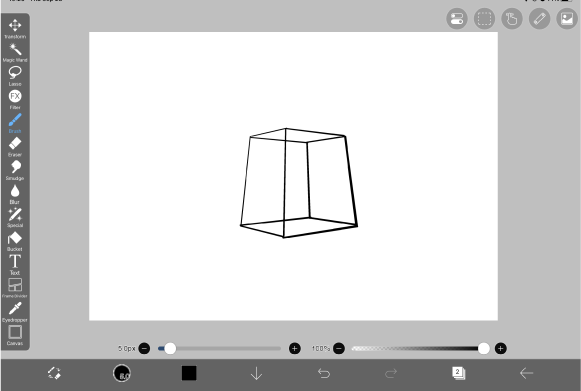
Once you have drawn all the lines, it is completed.

This drawing method can be used when you want to draw a three-dimensional and dynamic background.
This video introduces how to draw backgrounds that can be used in Manga, etc.
Click here for a video of the how to draw backgrounds.
This video introduces how to draw a condominium using Two-point perspective.
Click here for a video of the Perspective Array Ruler
Click here for details on the Perspective Array Ruler
Array Ruler
The Array Ruler is a function where if you draw an illustration on one square of up to 10 x 10 squares, it will be drawn on all squares.
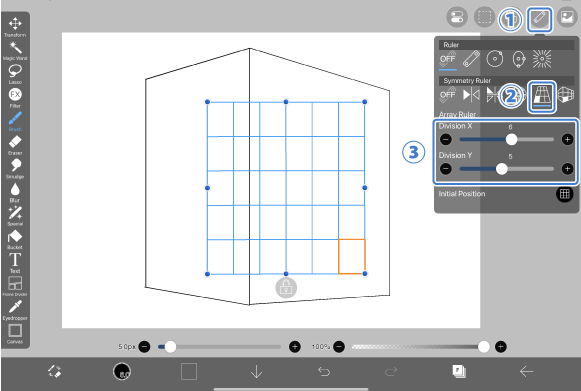
Let’s draw multiple windows in the Two-point perspective box drawn using the Perspective Array Ruler. From the ①[Ruler Tool], select the ②[Array Ruler]. Drag the ③[Division X and Division Y] sliders left and right to adjust the number of divisions. This time, it is set to 6 x 5 squares.
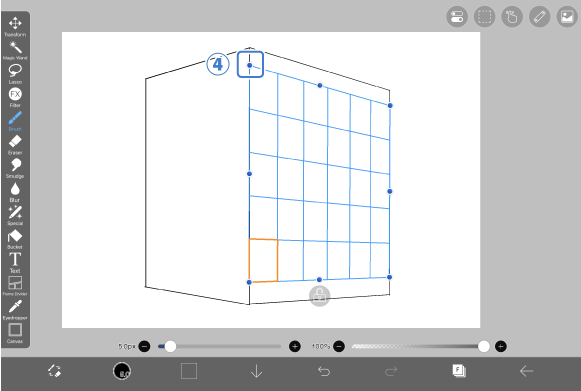
You can add perspective by dragging the ④[Vertex knob].
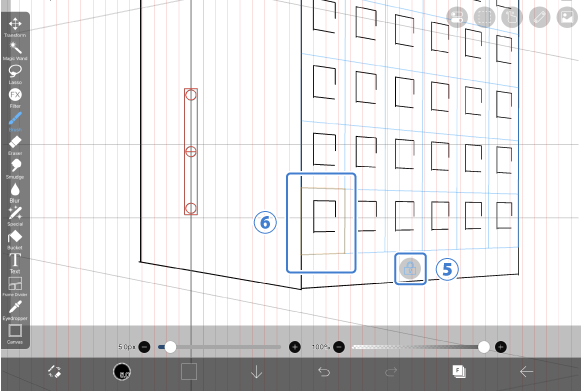
Tap the ⑤[Lock button] and draw in the orange ⑥[Working Cell].
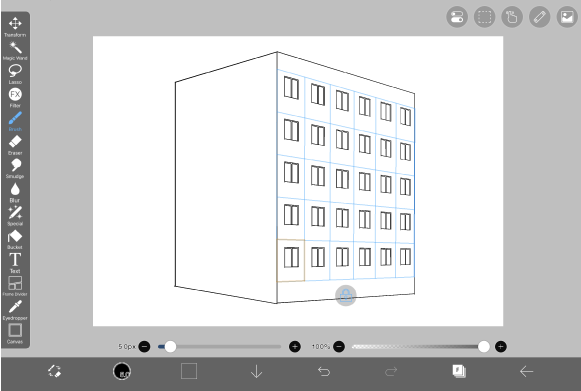
Windows were drawn in all the squares at once.

Since you do not have to draw multiple things one by one, you can improve your work efficiency greatly.
Chapter
-
 01.Introduction
 -
 02.Start Creating an Artwork
 -
 03.Toolbar and Tool Selection
 -
 04.Do Your Draft Sketch by Hand
 -
 05.About Layers
 -
 06.Let's Trace
 -
 07.Undo and Eraser
 -
 08.Fine Tuning Using the Lasso tool
 -
 09.Check by Reflecting Horizontally
 -
 10.Select Colors in the Color window
 -
 11.Use Color Fill for the Undercoat
 -
 12.Turn Clipping On
 -
 13.Making a Gradation (Shading)
 -
 14.Select a color from the canvas or layer
 -
 15.Set the Time before Quick Eyedropper Starts
 -
 16.Create Highlights and Shadows
 -
 17.Paste a Texture
 -
 18.Let's Merge Layers
 -
 19.Sign Your Artwork
 -
 20.View Your Artwork
 -
 21.Post Your Artwork
 -
 22.Share Your Artwork
 -
 23.Open your ibisPaint data in Clip Studio Paint
 -
 24.Premium Membership / Ad Removal Upgrade (for iPhone/iPad, Android)
 -
 25.Premium Membership / Pro Upgrade (for Windows, Mac)
 -
 26.Synchronizing the artworks on your device with Cloud Storage
 -
 27.Save the past state of an Artwork as an IPV file
 -
 28.Rearrange artworks
 -
 29.Artworks Folder Feature
 -
 30.Make custom brush
 -
 31.Create Original Brush Patterns
 -
 32.Installing and Exporting the Custom Brush
 -
 33.Release a Custom Brush to the Online Gallery
 -
 34.Brush Export and Import
 -
 35.Search For Brushes
 -
 36.Display images to use as reference
 -
 37.Add Color to the Analog Image using Multiply
 -
 38.Stabilizer
 -
 39.Layer: Clipping is convenient
 -
 40.Layer: Changing the color with Alpha Lock
 -
 41.Layer: Let's try using Screen Tone
 -
 42.Layer: Selection Layer
 -
 43.Layer: Save Layer as Transparent PNG command
 -
 44.Layer: Naming your layers to manage them
 -
 45.Layer: Rasterize
 -
 46.Layer: Layer Folders
 -
 47.Layer: Folder Move/Transform
 -
 48.Layer: Add Layer from Canvas
 -
 49.Vector Layer
 -
 50.How to edit a brush shape
 -
 51.Contents Layer Selection
 -
 52.Apply Canvas Papers to your canvas
 -
 53.Display Grid on the Canvas
 -
 54.Export an Artwork (Save)
 -
 55.Export in CMYK (Save)
 -
 56.Save canvas as Transparent PNG
 -
 57.Make the background transparent with Eraser Bucket
 -
 58.Bucket Tool: Surrounding Fill / Surrounding Eraser
 -
 59.Putting texture to the floor with Perspective Form
 -
 60.Skirt with Mesh Form
 -
 61.Entering text with Text tool
 -
 62.Creating manga with Frame Divider tool
 -
 63.Enlarging the canvas with Canvas Size
 -
 64.Cutting off the canvas with Trim
 -
 65.Create a Manga Manuscript for Printing
 -
 66.Canvas creation with resolution (dpi) specification
 -
 67.Changing image resolution with Resize
 -
 68.Change canvas Color Mode
 -
 69.Output High-Resolution Images with AI (Artificial Intelligence)
 -
 70.AI Disturbance
 -
 71.Texture with Material tool
 -
 72.Cut, Copy, Paste
 -
 73.Ruler: Straight Ruler
 -
 74.Ruler: Circular Ruler
 -
 75.Ruler: Elliptical Ruler
 -
 76.Ruler: Radial Ruler
 -
 77.Ruler: Mirror Ruler
 -
 78.Ruler: Kaleidoscope Ruler
 -
 79.Ruler: Array Ruler
 -
 80.Ruler: Perspective Array Ruler
 -
 81.Drawing Tool: Straight Line
 -
 82.Drawing Tool: Rectangle
 -
 83.Drawing Tool:Circle
 -
 84.Drawing Tool:Ellipse
 -
 85.Drawing Tool:Regular Polygon
 -
 86.Drawing Tool:Bezier Curve
 -
 87.Drawing Tool:Polyline
 -
 88.Drawing Tool:Fill
 -
 89.Selection Area tool: Color Range
 -
 90.Selection Area tool: Expand/Contract Selection Area
 -
 91.Special: Liquify Pen
 -
 92.Special: Lasso Fill
 -
 93.Special: Lasso Eraser
 -
 94.Special: Copy Pen
 -
 95.Filter (Adjust Color): Brightness & Contrast
 -
 96.Filter (Adjust Color): Tone Curve
 -
 97.Filter (Adjust Color): Hue Saturation Lightness
 -
 98.Filter (Adjust Color): Color Balance
 -
 99.Filter (Adjust Color): Extract Line Drawing
 -
 100.Filter (Adjust Color): Find Edges (Handwriting)
 -
 101.Filter (Adjust Color): Find Edges
 -
 102.Filter (Adjust Color): Change Drawing Color
 -
 103.Filter (Adjust Color): Mono Color
 -
 104.Filter (Adjust Color): Grayscale
 -
 105.Filter (Adjust Color): Black & White
 -
 106.Filter (Adjust Color): Posterize
 -
 107.Filter (Adjust Color): Invert Color
 -
 108.Filter (Adjust Color): Gradation Map
 -
 109.Filter (Adjust Color): Levels Adjustment
 -
 110.Filter (Adjust Color): Replace Color
 -
 111.Filter (Blur): Gaussian Blur
 -
 112.Filter (Blur): Zooming Blur
 -
 113.Filter (Blur): Moving Blur
 -
 114.Filter (Blur):Spin Blur
 -
 115.Filter (Blur): Lens Blur
 -
 116.Filter (Blur): Mosaic
 -
 117.Filter (Blur): Unsharp Mask
 -
 118.Filter (Blur): Frosted Glass
 -
 119.Filter (Style): Stroke (Both)
 -
 120.Filter (Style): Stained Glass
 -
 121.Filter (Style): Wet Edge
 -
 122.Filter (Style): Glow (Inner)
 -
 123.Filter (Style): Bevel (Inner)
 -
 124.Filter (Style): Bevel (Outer)
 -
 125.Filter (Style): Emboss
 -
 126.Filter (Style): Relief
 -
 127.Filter (Style): Waterdrop (Rounded)
 -
 128.Filter (Style): Stroke (Outer)
 -
 129.Filter (Style): Glow (Outer)
 -
 130.Filter (Style): Satin
 -
 131.Filter (Style): Drop Shadow
 -
 132.Filter (Style): Extrude
 -
 133.Filter (Style): God Rays
 -
 134.Filter (Draw): Parallel Gradation
 -
 135.Filter (Draw): Concentric Gradation
 -
 136.Filter (Draw): Radial Line Gradation
 -
 137.Filter (Draw): Radial Line
 -
 138.Filter (Draw): Speed Line
 -
 139.Filter (Draw): Clouds
 -
 140.Filter (Draw): QR Code
 -
 141.Filter (AI): Watercolor Filter
 -
 142.Filter (AI): Background Removal
 -
 143.Filter (Artistic): Anime Background
 -
 144.Filter (Artistic): Manga Background
 -
 145.Filter (Artistic): Chromatic Aberration (Color Shift, RGB Shift)
 -
 146.Filter (Artistic): Glitch
 -
 147.Filter (Artistic): Noise
 -
 148.Filter (Artistic): Retro Game
 -
 149.Filter (Artistic): Chrome
 -
 150.Filter (Artistic): Bloom
 -
 151.Filter (Artistic): Cross Filter
 -
 152.Filter (Artistic): Sheer
 -
 153.Filter (Pixelate): Pixelate Crystalize
 -
 154.Filter (Pixelate): Hexagonal Pixelate
 -
 155.Filter (Pixelate): Square Pixelate
 -
 156.Filter (Pixelate): Triangular Pixelate
 -
 157.Filter (Pixelate): Pointillize
 -
 158.Filter (Pixelate): Dots (Hexagonal)
 -
 159.Filter (Pixelate): Dots (Square)
 -
 160.Filter (Transform): Expansion
 -
 161.Filter (Transform): Fisheye Lens
 -
 162.Filter (Transform): Sphere Lens
 -
 163.Filter (Transform): Wave
 -
 164.Filter (Transform): Ripple
 -
 165.Filter (Transform): Twirl
 -
 166.Filter (Transform): Polar Coordinates
 -
 167.Filter (Frame): Table
 -
 168.Filter (Frame): Blur Frame
 -
 169.Filter (Movie): Rain
 -
 170.Adjustment Layer
 -
 171.Create an animation
 -
 172.Manga Function: Let's create a manga manuscript
 -
 173.Manga Function: Master the Manga creation tools
 -
 174.Manga Function: Make Use of Materials
 -
 175.Manga Function: Publishing and Printing your Manga
 -
 176.Changing Devices & File Transfers
 -
 177.Settings window details
 -
 178.Change the Background Color of the Canvas
 -
 179.Details of Brush Parameters
 -
 180.Bucket tool details
 -
 181.Layer Window Details
 -
 182.Transform tool details
 -
 183.Blend mode details
 -
 184.View Menu details
 -
 185.How to upload transparent PNG onto X
 -
 186.Importing and exporting Photoshop files (PSD)
 -
 187.Posting Multiple Pages of Comic to the Online Gallery
 -
 188.Gestures, Keyboard shortcuts (iOS,iPadOS,Android versions)
 -
 189.Gestures, Keyboard shortcuts (Windows Version)
 -
 190.Display a Crosshair Symbol When Hovering the Stylus Pen
 -
 191.Set Up Palm Rejection
 -
 192.Use a Promo Code
 -
 193.Delete Account
