

 Information
Notifications
Tutorials
50. Vector Layer
What is a Vector Layer
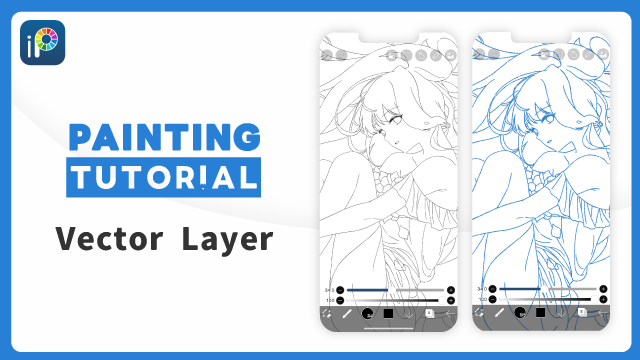
A vector layer is a special layer where the data does not degrade even with repeated scaling.
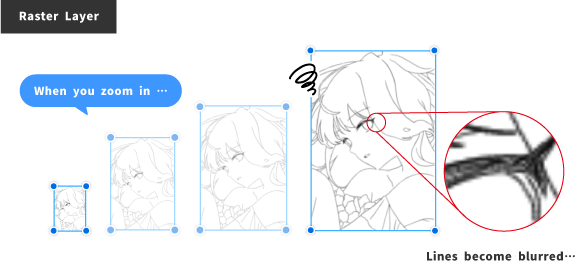
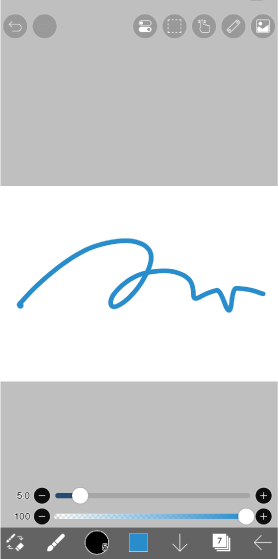
Lines drawn on a raster (normal) layer degrade with each scaling,
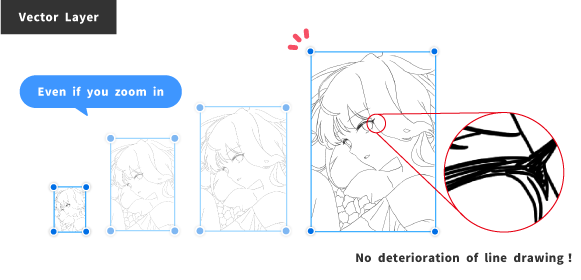
Meanwhile, lines drawn on a vector layer do not degrade even with repeated scaling.
The difference between Raster Layer and Vector Layer
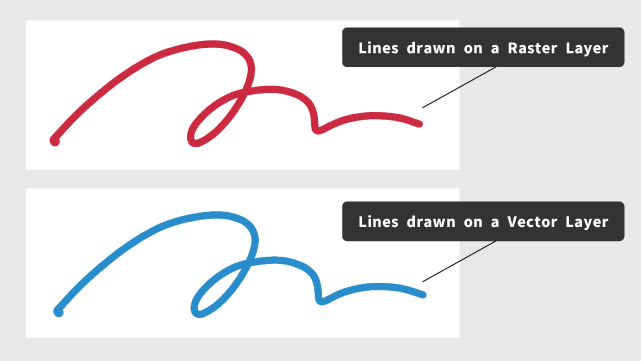
There is no visual difference between lines drawn on vector layers and raster layers. The difference is in the way each layer records the drawn lines.
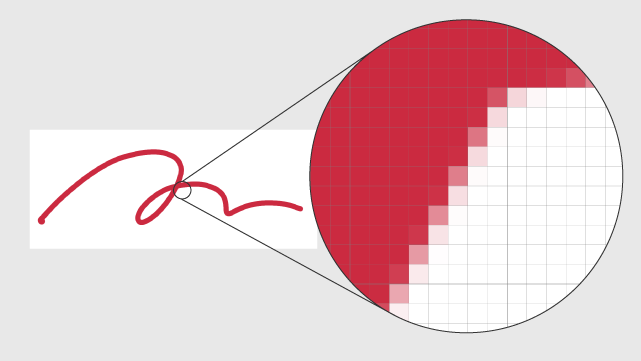
Raster layers are composed of small squares (pixels).
One advantage of raster layers is that there are no limitations on functionality. You can easily perform all the necessary steps for drawing a picture, such as line drawing, coloring, and processing. However, the biggest weakness is that when you enlarge, reduce, or transform, the lines degrade.
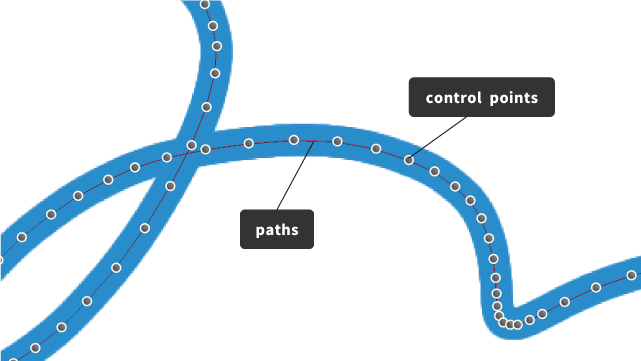
On the other hand, the vector layer is drawn with coordinates of points (vertices) and lines connecting the points (paths).
The information of the lines is recorded by these vertices and paths, allowing the lines to remain clean even when zooming in or out.
In ibisPaint, a line drawn on a vector layer like this is called a “brush shape”.
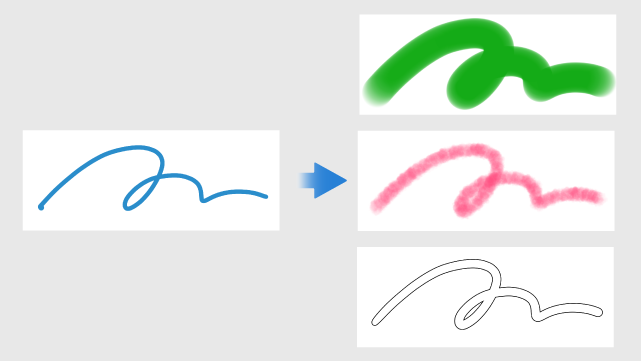
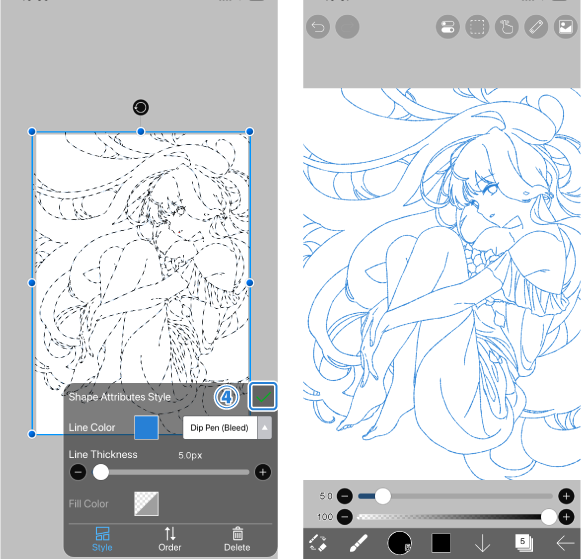
Additionally, lines drawn on vector layers can be modified later to change the type of pen, thickness, and color of the line.
This is also considered a benefit of using vector layers.
However, the drawback is that some functions such as fill tool, fingertip tool, and blur tool are not available. Taking the above into consideration, vector layers are proficient in drawing lines, while raster layers excel in other general tasks ( such as coloring and processing).
How to create vector layer
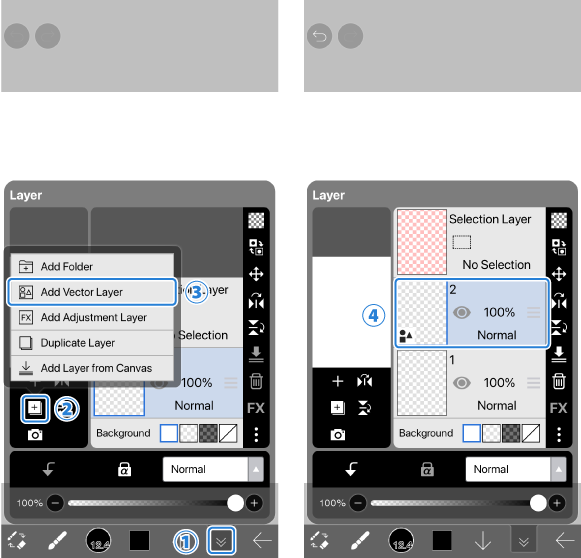
Open the ①[ Layer Window ].
Select ②[ Add Special Layer ] and then choose ③[ Add Vector Layer ].
Select the newly added ④[ New Vector Layer ] on the working layer.
All lines drawn on the vector layer will be displayed as brush shape.
In addition to the above methods, a vector layer can be added by using the Vector Dip Pen and Vector Felt Tip Pen .
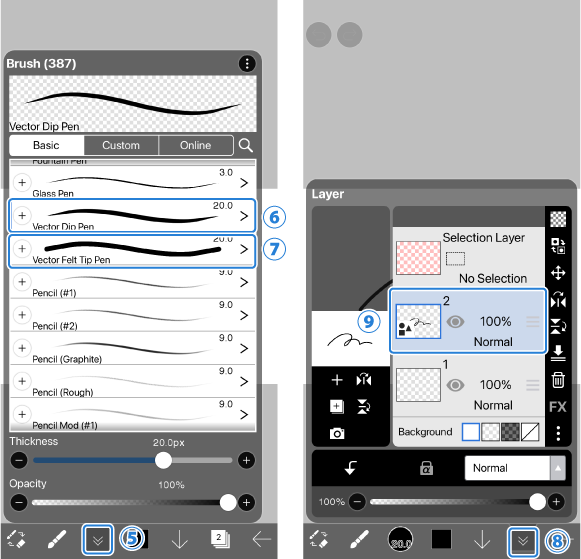
Open the⑤[ Brush Window ].br>
Select ⑥[ Vector Dip Pen ] or ⑦[ Vector Felt Tip Pen ] from the brush list and draw a line on the canvas.
Open ⑧[ Layer Window ] and you will see that ⑨[ New Vector Layer ] has been added.
How to select shapes
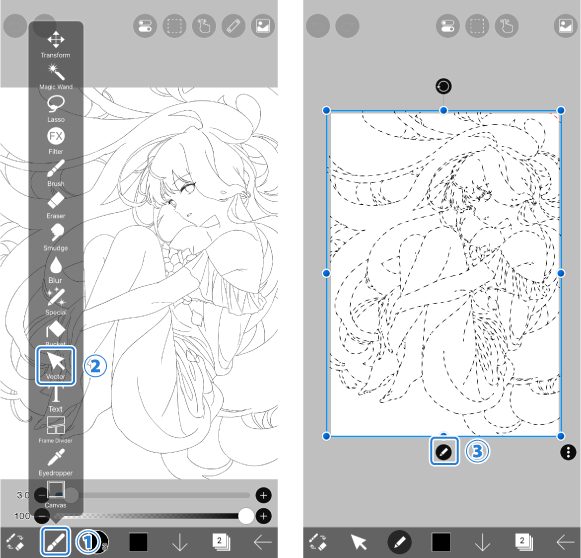
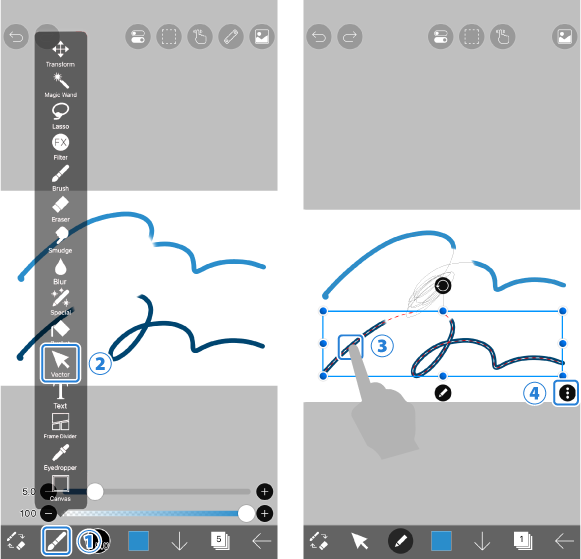
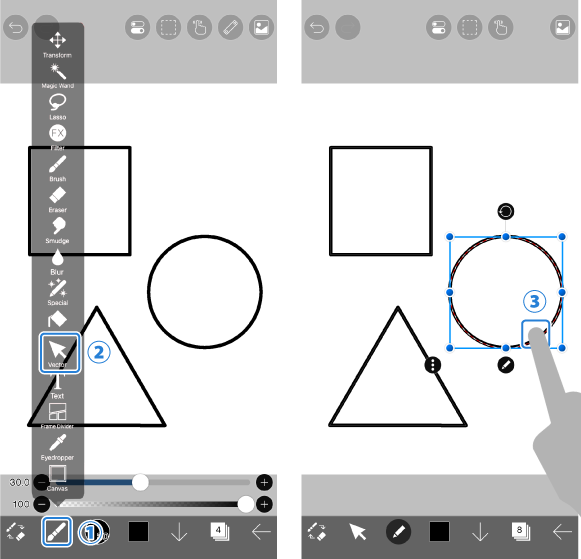
Open ①[ Tool Select window ] and select ②[ Vector ].
Tap on ③[ the shape you want to select ] to select it.
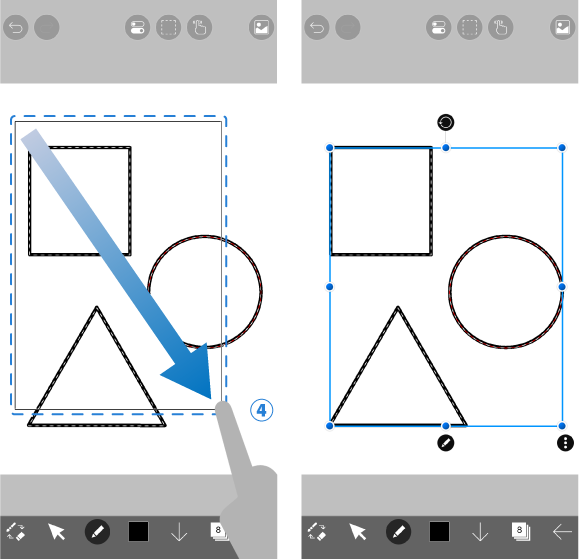
If you want to select multiple or all shapes, ④[ drag ] diagonally to select them.
If you want to deselect a shape, you can do so by ⑤[ tapping ] on it.
Vector Command menu
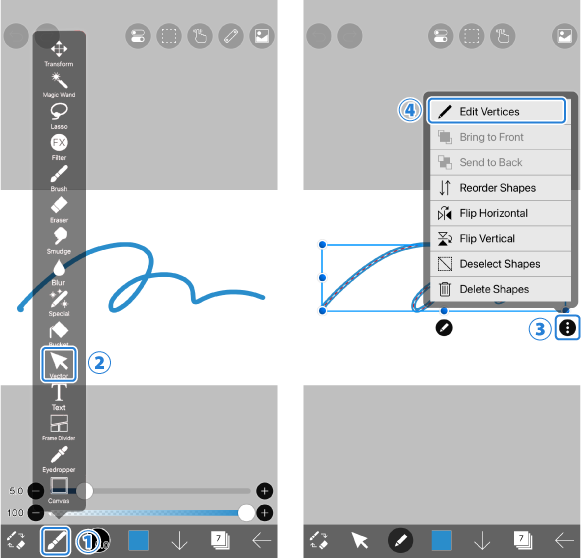
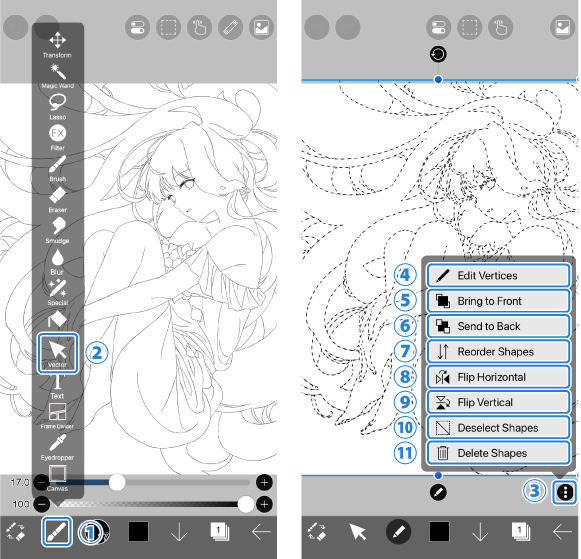
Select ②[ Vector ] from the ①[ Tool Select window ].
The Vector Command menu appears when you select a shape and tap the ③[ ︙ button ].
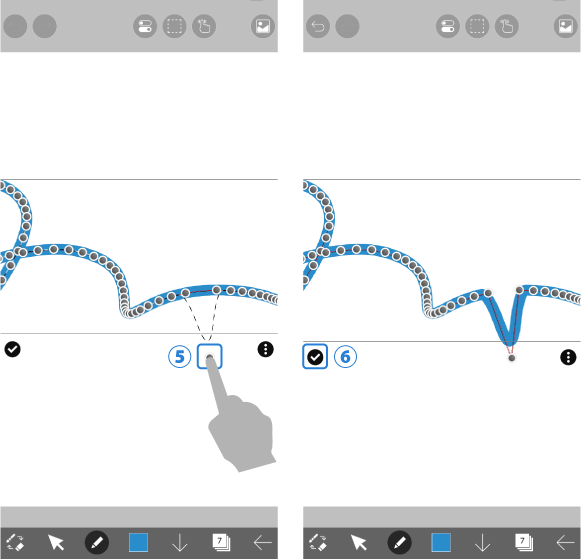
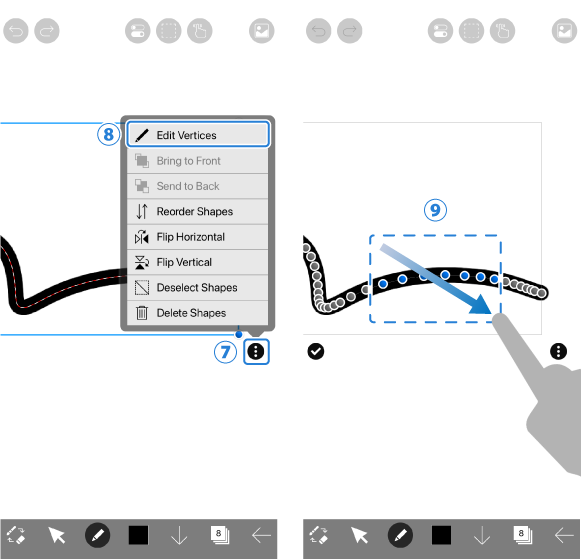
④[ Edit Vertices ]…Switches to vertices’ editing mode.
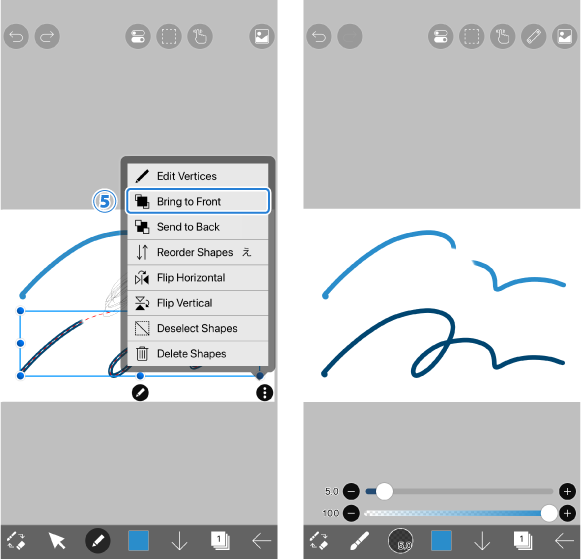
⑤[ Bring to Front ]…Moves the selected shape to the front.
⑥[ Send to Back ]…Moves the selected shape to the back.
⑦[ Reorder Shapes ]…Allows you to edit the stacking order of the shapes freely.
⑧[ Flip Horizontal ]…Flips the selected shape horizontally.
⑨[ Flip Vertical ]…Flips the selected shape vertically.
⑩[ Deselect Shapes ]…Deselects all the selected shapes.
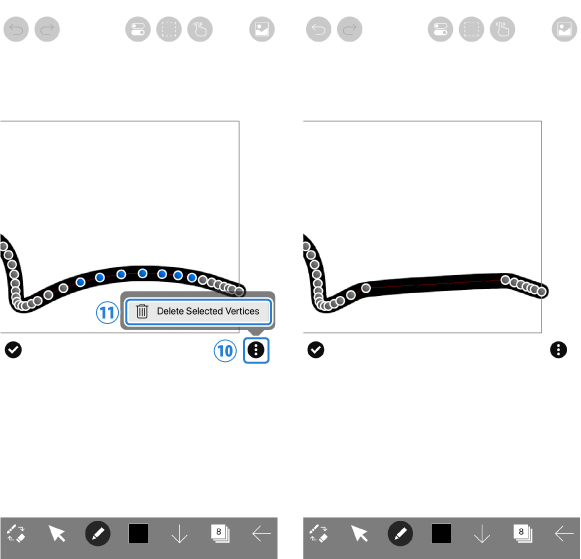
⑪[ Delete Shapes ]…Deletes all the selected shapes.
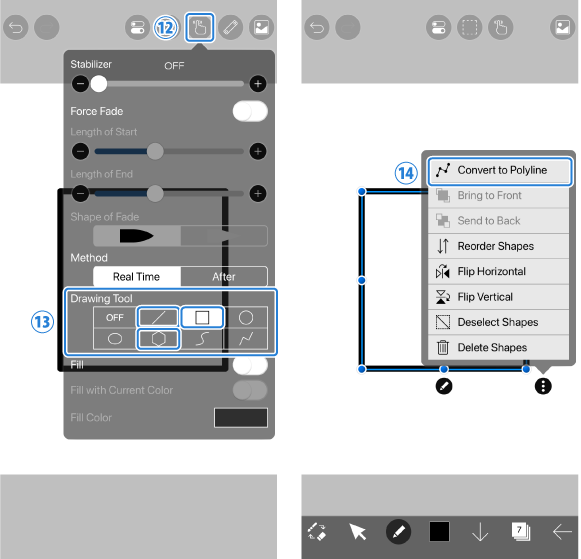
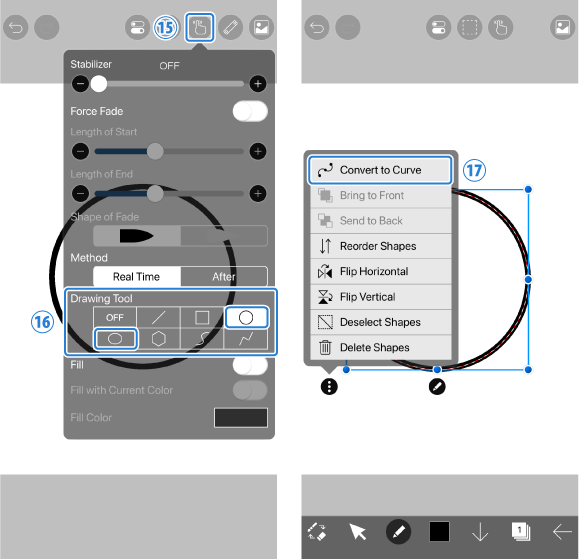
In the case of straight lines, rectangles, and regular polygon shapes drawn with the ⑬[ Drawing Tool ] of the ⑫[ Stabilizer Window ], ⑭[ Convert to Polyline ] option will be displayed in the Vector Command menu.
By converting a shape to polyline, you can edit the vertices.
In the case of circle or ellipse shape drawn with the ⑬[ Drawing Tool ] of the ⑫[ Stabilizer Window ], ⑭[ Convert to Curve ] option will be displayed in the Vector Command menu.
By converting a shape to curve, you can edit the vertices.
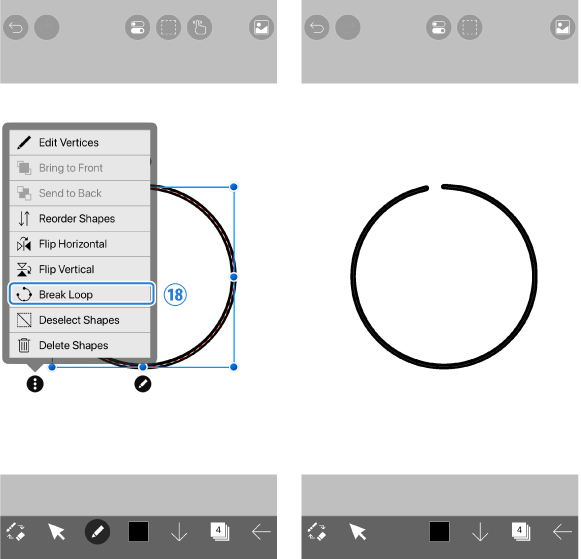
In the case of a looped shape, the ⑱[ Break Loop ] option will be displayed in the Vector Command menu.
By selecting it, you can break the loop of the shape.
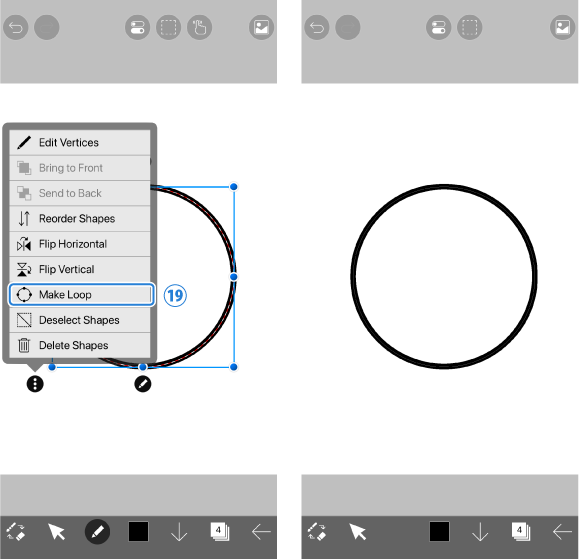
In the case of a shape after breaking the loop, the ⑱[ Make Loop ] option will be displayed in the Vector Command menu.
By selecting it, you can make the shape looped.
A looped shape refers to the following shapes:
・Rectangular and polygon shapes drawn with the Drawing Tool and converted to Polylines
・Circle and ellipse shapes drawn with the Drawing Tool and converted to Curves
・Loops created with the Drawing Tool’s Bezier Curve or Polyline
The limitations of using vector layers
As mentioned earlier, there are several functions that cannot be used in vector layers. If you want to use the following functions, you need to rasterize the vector layer:
- Blur / Smudge tool
- Alpha lock
- Perspective transformation / Mesh transformation
- Filters
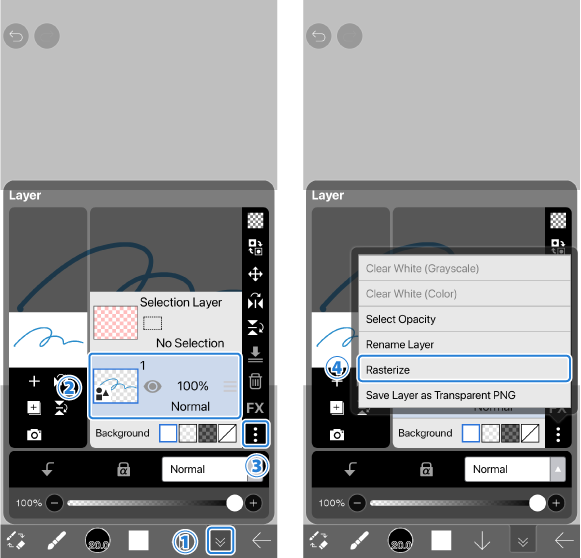
You can rasterize a vector layer in the following ways.
* Be careful because once you rasterize, you cannot revert it back to a vector layer.
Open the ①[ Layer Window ]
Select the ②[ layer you want to rasterize ] and tap the ③[ ︙ button ].
Choose ④[ Rasterize ] from the command menu.
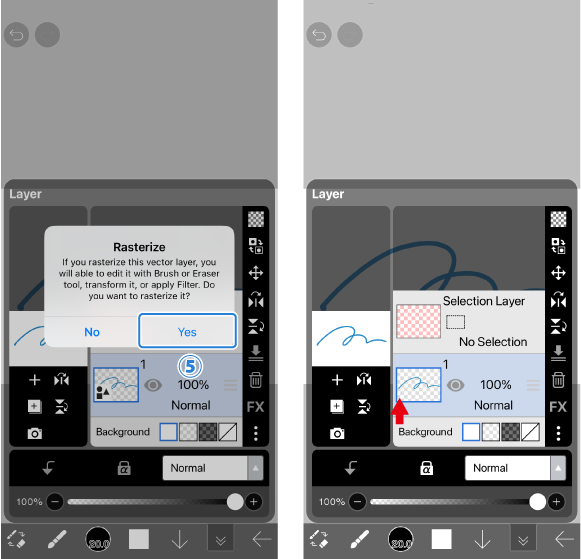
Confirm the rasterize dialog box by selecting the ⑤[ Yes ] option.
The icon of the vector layer will disappear, indicating that it has been converted to a raster layer.
Eraser Functions Available for Vector Layers
Differences Between Raster Eraser Tool and Vector Eraser Tool
On vector layers, you can use two types of eraser functions: the raster eraser tool and the vector eraser tool. Use the eraser tool that best fits your task and purpose.
The vector eraser tool deletes lines based on their path information. This allows you to instantly erase an entire selected line by dragging over it, or to delete only the parts where lines intersect. The image above shows an example of using the vector eraser tool set to “up to intersection” (the erased areas are shown in red).
On the other hand, the raster eraser tool allows you to partially modify lines in a freeform manner, just like the eraser function on a regular layer. However, the raster eraser tool does not actually delete or cut the lines—it simply makes them invisible. This point will be explained in more detail in the later section, “How the Raster Eraser Tool Works and Cautions When Merging with Vector Layers.”
How to Use the Vector Eraser Tool
The vector eraser tool is suitable for tasks such as deleting entire lines or cutting up to the intersection with other lines. In the sample illustration, we’ll explain how to use the vector eraser to remove unnecessary parts of the line art for hair.
First, let’s delete only the part of the line (A) [ the portion that extends beyond ].
Set the vector layer containing the target line as the active layer, then select ①[ Tool Selection Window ], choose ②[ Vector ], and select ③[ Vector Eraser ].
For the mode, choose ④[ Up to Intersection ].
For the line end, select either ⑤[ Tapered ] or [ Round ] to determine the shape of the line’s endpoint after cutting.
By dragging with your finger ⑥[ Drag ] across the line you want to erase so that it intersects with another line, you can delete the portion of the line up to the intersection point.
To delete an entire line, select ⑦[ Entire Line ], then ⑧[ Drag ] across the line you want to erase so that it intersects with it—you can then delete the entire line.
If the line you want to delete is very short, it may be difficult to drag across it.
In such cases, you can ⑨[ Drag ] around the lineto enclose it, allowing you to delete the line withinthe enclosed area.
How to Use the Raster Eraser Tool
The raster eraser tool is suitable when you want to partially modify a line in a freeform shape. In the sample illustration, we’ll explain how to adjust the length of a hairline.
Let’s use the raster eraser tool on a vector layer to adjust the length of the line (B)[ line ]. Select ①[ Tool Selection Window ], then choose ②[ Eraser ].
Just like when using the eraser tool on a regular layer (raster layer), you can delete a line by ③[ Dragging ] over the part you want to erase. For more details on how to configure the raster eraser tool, please refer to “Drawing Tutorial: 07. Undo and Eraser."
How the Raster Eraser Tool Works and Cautions When Merging Vector Layers
When using the raster eraser tool on a vector layer, lines are not actually deleted or cut—instead, they are simply made invisible. As a result, when merging vector layers, unintended lines may disappear. In this section, we will explain how the raster eraser tool works and how to address the issue of lines unintentionally disappearing during layer merging.
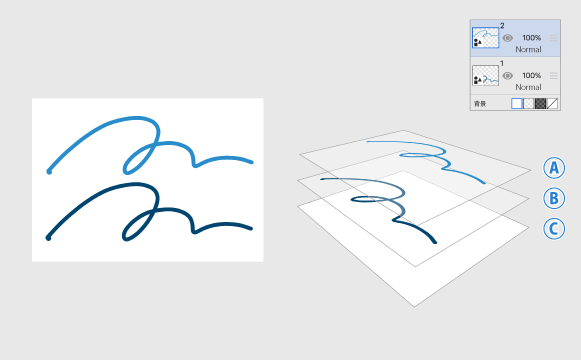
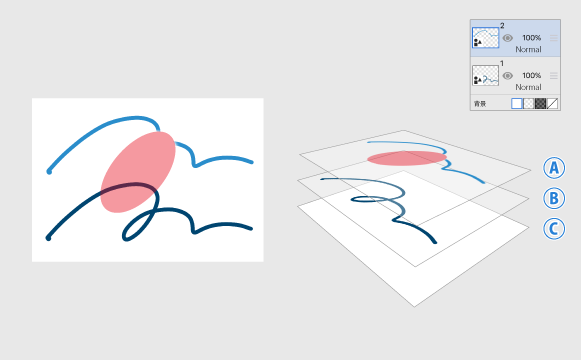
As an example, we will explain how the raster eraser tool works in the situation shown in the image above. Let’s refer to the top layer as [A], the middle layer as [B], and the background layer as [C].
A portion of the line drawn on [A] is erased using the eraser tool (The erased area is shown in red).
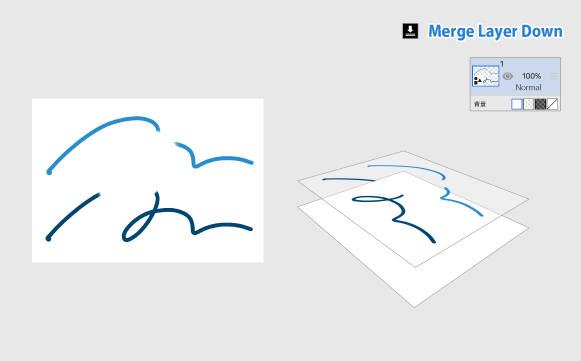
Next, layers [A] and [B] are merged. As a result, part of the line on [B] also disappears. The reason part of [B]’s line was erased lies in how the raster eraser tool works.
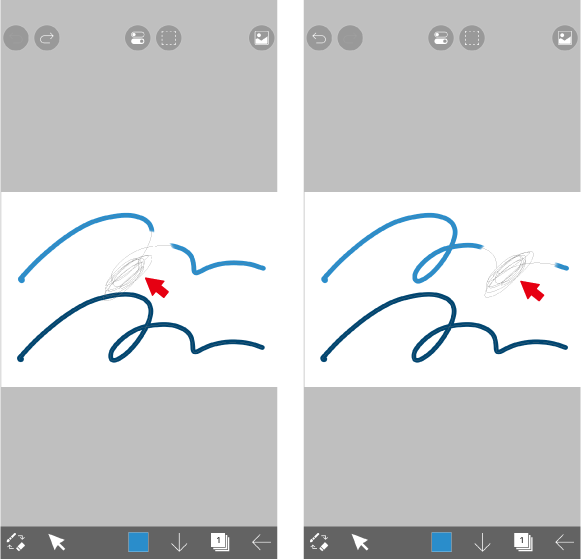
When checked with the vector tool, you can see that there is a line without color where the eraser was applied. This transparent line was created when the raster eraser tool was used on the vector layer and is called an “eraser shape.” Eraser shapes, like other lines, can be moved or have their style changed.
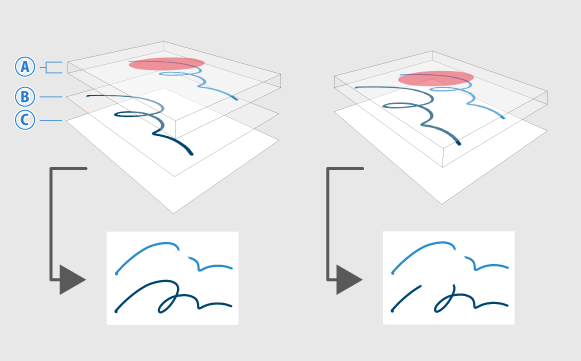
Eraser shapes do not actually delete lines—they work by overlapping lines within the same vector layer, hiding the lines underneath. When [A] and [B] were merged, the lines originally on [B] became subject to the eraser shapes as well, which is why some lines unintentionally disappeared when the vector layers were merged.
You can make hidden lines reappear by following the steps below.
Select ①[ Vector ] from the ②[ Tool Selection Window ].
Choose ③[ the desired line that you want to display again ] and tap on the ④[ ︙ button ].
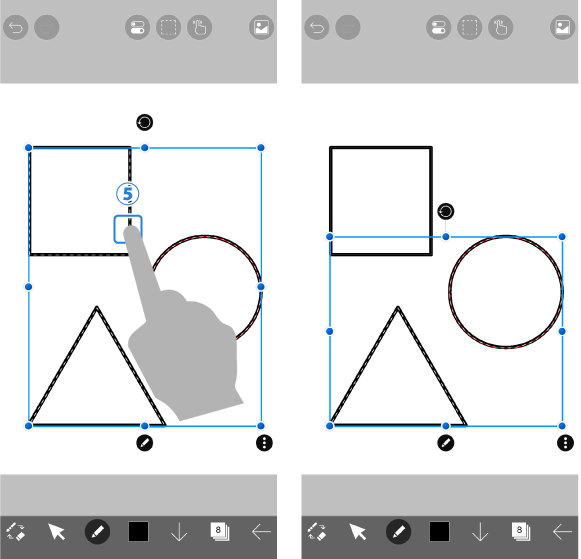
Select ⑤[ Bring to Front ] and move the desired line to the front.
You can now bring back the hidden line by displaying it again.
 Vector Layer
Chapter
-
 01.Introduction
 -
 02.Start Creating an Artwork
 -
 03.Toolbar and Tool Selection
 -
 04.Do Your Draft Sketch by Hand
 -
 05.About Layers
 -
 06.Let's Trace
 -
 07.Undo and Eraser
 -
 08.Fine Tuning Using the Lasso tool
 -
 09.Check by Reflecting Horizontally
 -
 10.Select Colors in the Color window
 -
 11.Use Color Fill for the Undercoat
 -
 12.Turn Clipping On
 -
 13.Making a Gradation (Shading)
 -
 14.Select a color from the canvas or layer
 -
 15.Set the Time before Quick Eyedropper Starts
 -
 16.Create Highlights and Shadows
 -
 17.Paste a Texture
 -
 18.Let's Merge Layers
 -
 19.Sign Your Artwork
 -
 20.View Your Artwork
 -
 21.Post Your Artwork
 -
 22.Share Your Artwork
 -
 23.Open your ibisPaint data in Clip Studio Paint
 -
 24.Premium Membership / Ad Removal Upgrade (for iPhone/iPad, Android)
 -
 25.Premium Membership / Pro Upgrade (for Windows, Mac)
 -
 26.Smart Features and Smart Credits
 -
 27.Synchronizing the artworks on your device with Cloud Storage
 -
 28.Save the past state of an Artwork as an IPV file
 -
 29.Rearrange artworks
 -
 30.Artworks Folder Feature
 -
 31.Make custom brush
 -
 32.Create Original Brush Patterns
 -
 33.Installing and Exporting the Custom Brush
 -
 34.Release a Custom Brush to the Online Gallery
 -
 35.Brush Export and Import
 -
 36.Search For Brushes
 -
 37.Display images to use as reference
 -
 38.Add Color to the Analog Image using Multiply
 -
 39.Stabilizer
 -
 40.Layer: Clipping is convenient
 -
 41.Layer: Changing the color with Alpha Lock
 -
 42.Layer: Let's try using Screen Tone
 -
 43.Layer: Selection Layer
 -
 44.Layer: Save Layer as Transparent PNG command
 -
 45.Layer: Naming your layers to manage them
 -
 46.Layer: Rasterize
 -
 47.Layer: Layer Folders
 -
 48.Layer: Move/Transform Layer Folder
 -
 49.Layer: Add Layer from Canvas
 -
 50.Vector Layer
 -
 51.How to edit a brush shape
 -
 52.Contents Layer Selection
 -
 53.Apply Canvas Papers to your canvas
 -
 54.Display Grid on the Canvas
 -
 55.Export an Artwork (Save)
 -
 56.Export in CMYK (Save)
 -
 57.Save canvas as Transparent PNG
 -
 58.Make the background transparent with Eraser Bucket
 -
 59.Bucket Tool: Surrounding Fill / Surrounding Eraser
 -
 60.Putting texture to the floor with Perspective Form
 -
 61.Skirt with Mesh Form
 -
 62.Entering text with Text tool
 -
 63.Creating manga with Frame Divider tool
 -
 64.Enlarging the canvas with Canvas Size
 -
 65.Cutting off the canvas with Trim
 -
 66.Create a Manga Manuscript for Printing
 -
 67.Canvas creation with resolution (dpi) specification
 -
 68.Changing image resolution with Resize
 -
 69.Change canvas Color Mode
 -
 70.Output High-Resolution Images with AI (Artificial Intelligence)
 -
 71.AI Disturbance
 -
 72.Texture with Material tool
 -
 73.Cut, Copy, Paste
 -
 74.Ruler: Straight Ruler
 -
 75.Ruler: Circular Ruler
 -
 76.Ruler: Elliptical Ruler
 -
 77.Ruler: Radial Ruler
 -
 78.Ruler: Mirror Ruler
 -
 79.Ruler: Kaleidoscope Ruler
 -
 80.Ruler: Array Ruler
 -
 81.Ruler: Perspective Array Ruler
 -
 82.Shape Tool
 -
 83.Drawing Tool: Straight Line
 -
 84.Drawing Tool: Rectangle
 -
 85.Drawing Tool:Circle
 -
 86.Drawing Tool:Ellipse
 -
 87.Drawing Tool:Regular Polygon
 -
 88.Drawing Tool:Bezier Curve
 -
 89.Drawing Tool:Polyline
 -
 90.Shape Tool: Rounded Rectangle
 -
 91.Shape Tool: Thin Arrow
 -
 92.Shape Tool: Speech Bubble
 -
 93.Selection Area tool: Color Range
 -
 94.Selection Area tool: Expand/Contract Selection Area
 -
 95.Special: Liquify Pen
 -
 96.Special: Lasso Fill
 -
 97.Special: Lasso Eraser
 -
 98.Special: Copy Pen
 -
 99.Filter (Adjust Color): Brightness & Contrast
 -
 100.Filter (Adjust Color): Tone Curve
 -
 101.Filter (Adjust Color): Hue Saturation Lightness
 -
 102.Filter (Adjust Color): Color Balance
 -
 103.Filter (Adjust Color): Extract Line Drawing
 -
 104.Filter (Adjust Color): Find Edges (Handwriting)
 -
 105.Filter (Adjust Color): Find Edges
 -
 106.Filter (Adjust Color): Change Drawing Color
 -
 107.Filter (Adjust Color): Mono Color
 -
 108.Filter (Adjust Color): Grayscale
 -
 109.Filter (Adjust Color): Black & White
 -
 110.Filter (Adjust Color): Posterize
 -
 111.Filter (Adjust Color): Invert Color
 -
 112.Filter (Adjust Color): Gradation Map
 -
 113.Filter (Adjust Color): Levels Adjustment
 -
 114.Filter (Adjust Color): Replace Color
 -
 115.Filter (Blur): Gaussian Blur
 -
 116.Filter (Blur): Zooming Blur
 -
 117.Filter (Blur): Moving Blur
 -
 118.Filter (Blur):Spin Blur
 -
 119.Filter (Blur): Lens Blur
 -
 120.Filter (Blur): Mosaic
 -
 121.Filter (Blur): Unsharp Mask
 -
 122.Filter (Blur): Frosted Glass
 -
 123.Filter (Style): Stroke (Both)
 -
 124.Filter (Style): Stained Glass
 -
 125.Filter (Style): Wet Edge
 -
 126.Filter (Style): Glow (Inner)
 -
 127.Filter (Style): Bevel (Inner)
 -
 128.Filter (Style): Bevel (Outer)
 -
 129.Filter (Style): Emboss
 -
 130.Filter (Style): Relief
 -
 131.Filter (Style): Waterdrop (Rounded)
 -
 132.Filter (Style): Stroke (Outer)
 -
 133.Filter (Style): Glow (Outer)
 -
 134.Filter (Style): Satin
 -
 135.Filter (Style): Drop Shadow
 -
 136.Filter (Style): Extrude
 -
 137.Filter (Style): God Rays
 -
 138.Filter (Draw): Parallel Gradation
 -
 139.Filter (Draw): Concentric Gradation
 -
 140.Filter (Draw): Radial Line Gradation
 -
 141.Filter (Draw): Radial Line
 -
 142.Filter (Draw): Speed Line
 -
 143.Filter (Draw): Clouds
 -
 144.Filter (Draw): QR Code
 -
 145.Filter (Smart): Watercolor Filter
 -
 146.Filter (Smart): Background Removal
 -
 147.Filter (Artistic): Anime Background
 -
 148.Filter (Artistic): Manga Background
 -
 149.Filter (Artistic): Chromatic Aberration (Color Shift, RGB Shift)
 -
 150.Filter (Artistic): Glitch
 -
 151.Filter (Artistic): Noise
 -
 152.Filter (Artistic): Retro Game
 -
 153.Filter (Artistic): Chrome
 -
 154.Filter (Artistic): Bloom
 -
 155.Filter (Artistic): Cross Filter
 -
 156.Filter (Artistic): Sheer
 -
 157.Filter (Pixelate): Pixelate Crystalize
 -
 158.Filter (Pixelate): Hexagonal Pixelate
 -
 159.Filter (Pixelate): Square Pixelate
 -
 160.Filter (Pixelate): Triangular Pixelate
 -
 161.Filter (Pixelate): Pointillize
 -
 162.Filter (Pixelate): Dots (Hexagonal)
 -
 163.Filter (Pixelate): Dots (Square)
 -
 164.Filter (Transform): Expansion
 -
 165.Filter (Transform): Fisheye Lens
 -
 166.Filter (Transform): Sphere Lens
 -
 167.Filter (Transform): Wave
 -
 168.Filter (Transform): Ripple
 -
 169.Filter (Transform): Twirl
 -
 170.Filter (Transform): Polar Coordinates
 -
 171.Filter (Frame): Table
 -
 172.Filter (Frame): Blur Frame
 -
 173.Filter (Movie): Rain
 -
 174.Adjustment Layer
 -
 175.Create an animation
 -
 176.Animation Feature: Video Mode
 -
 177.Animation Feature: Audio Tracks in Video Mode
 -
 178.Manga Function: Let's create a manga manuscript
 -
 179.Manga Function: Master the Manga creation tools
 -
 180.Manga Function: Make Use of Materials
 -
 181.Manga Function: Publishing and Printing your Manga
 -
 182.Changing Devices & File Transfers
 -
 183.Settings window details
 -
 184.Change the Background Color of the Canvas
 -
 185.Details of Brush Parameters
 -
 186.Bucket tool details
 -
 187.Layer Window Details
 -
 188.Transform tool details
 -
 189.Blend mode details
 -
 190.View Menu details
 -
 191.How to upload transparent PNG onto X
 -
 192.Importing and exporting Photoshop files (PSD)
 -
 193.Posting Multiple Pages of Comic to the Online Gallery
 -
 194.Gestures, Keyboard shortcuts (iOS,iPadOS,Android versions)
 -
 195.Gestures, Keyboard shortcuts (Windows Version)
 -
 196.Display a Crosshair Symbol When Hovering the Stylus Pen
 -
 197.Set Up Palm Rejection
 -
 198.Use a Promo Code
 -
 199.About ibisAccount: Creating an Account
 -
 200.About ibisAccount: Log In
 -
 201.About ibisAccount: Delete Your Account
- Artwork Rankings

- Artist Rankings
- Official accounts


