

 Information
Notifications
Tutorials
82. Shape Tool
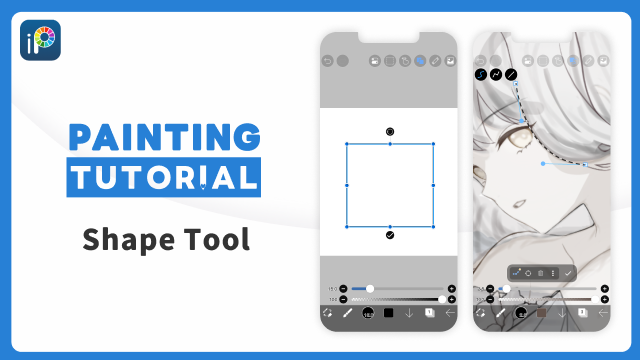
With the Shape Tool, you can easily draw clean shapes such as lines, rectangles and circles.
Shape Tool
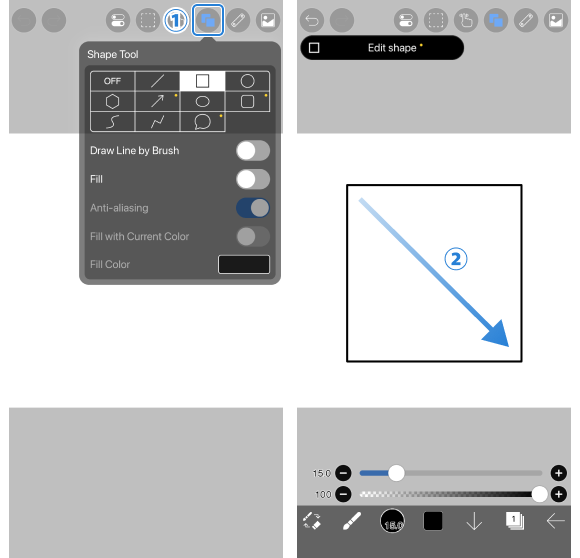
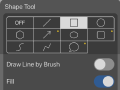
Tap the ①[ Shape Tool ] button on the toolbar to open the Shape Tool window.
Select the type of shape you want to draw, then ②[ drag ] to draw the shape.
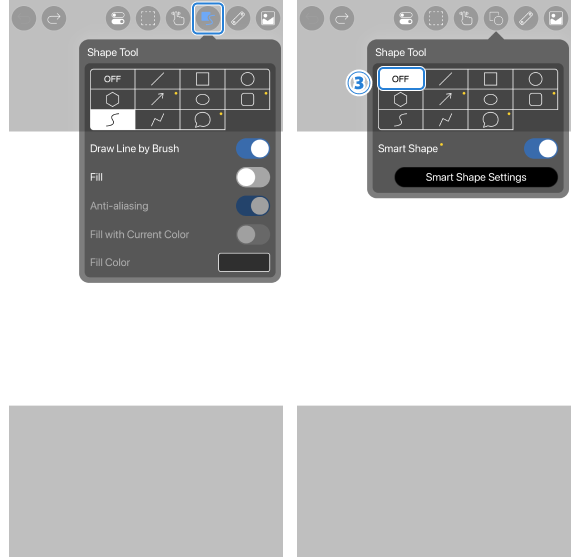
The appearance of the "Shape Tool" button changes depending on the selected shape, so you can tell at a glance which shape you have selected.
When no shape is selected (③[ OFF ]), you can draw lines freehand, and you can also use the "Smart Shape feature" explained in a later section.
Editing Shapes
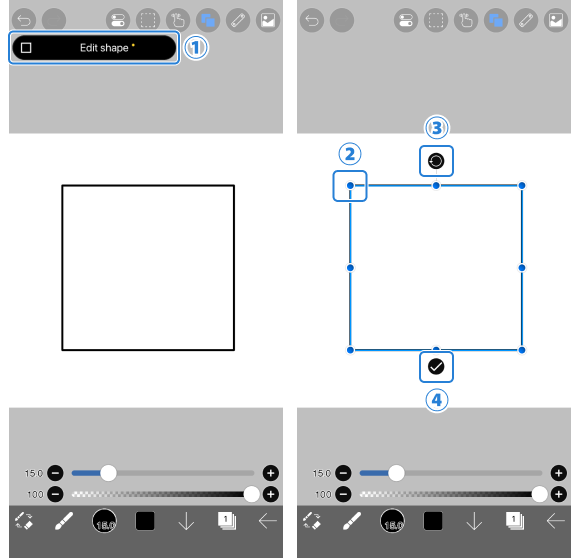
After you draw a shape with the Shape Tool, the ①[ Edit shape ] button appears at the top of the screen. Tap it to edit the shape you drew.
Drag the ②[ handles ] to adjust the form and size of the shape. Drag the ③[ Rotate button ] to change the angle of the shape.
When you have finished editing, tap the ④[ ✓ Button ] or switch to another tool to confirm your edits.
If you created the shape on a "Vector Layer", you can still edit it with the Vector tool even after confirming your edits.
Line and Fill Settings
Draw Line by Brush
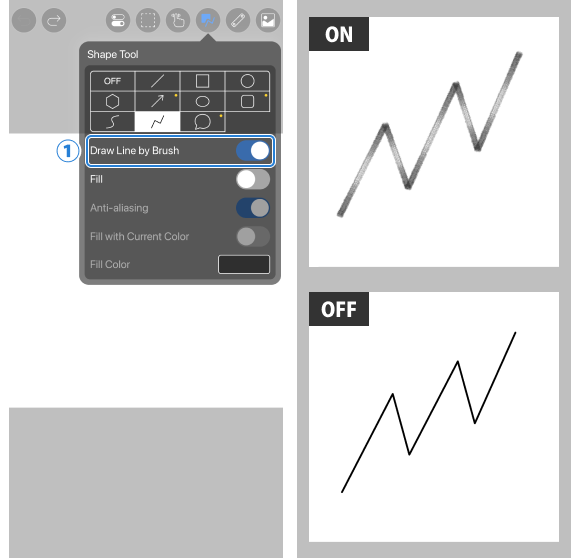
Select a shape with the Shape Tool and turn on ①[ Draw Line by Brush ] to draw the shape using the shape, thickness and opacity of the currently selected brush. When it is turned off, the shape is drawn with a simple line.
Fill and Anti-aliasing
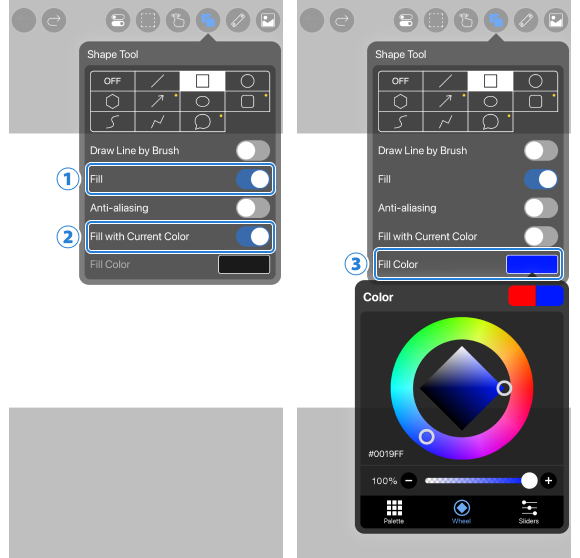
Select a shape that can be filled with the Shape Tool and turn on ①[ Fill ] to fill the inside of the shape.
When ②[ Fill with Current Color ] is turned on, the shape is filled with the currently selected drawing color. To set a different color, turn it off and tap the fill color's ③[ color picker ] to choose a color.
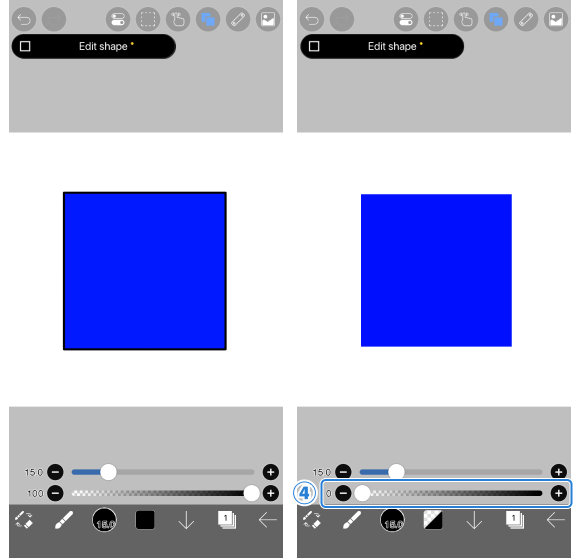
You have drawn a shape whose inside is filled.
If you want to create a simple filled shape, set the ④[ Opacity ] of the selected brush to 0 to draw a shape without an outline.
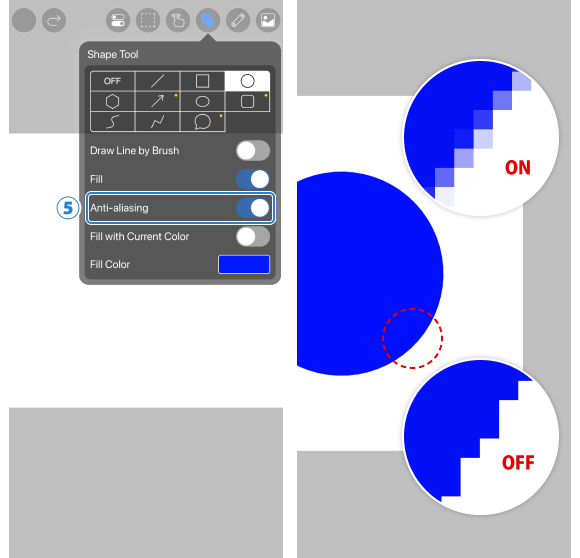
When Fill is turned on, you can set ⑤[ Anti-aliasing ]. When it is turned on, the outline of the shape, such as diagonal lines and curved parts, is displayed smoothly.
Smart Shape Feature
With the Smart Shape feature, you can draw neat shapes (curves, lines, rectangles, regular polygons, circles, ellipses and polylines) freehand, without selecting a shape type in the Shape Tool.
How to Use Smart Shape
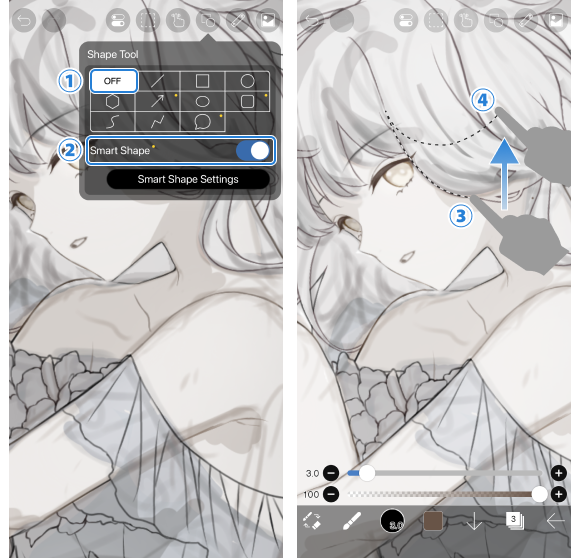
Select ①[ OFF ] in the Shape Tool and turn on ②[ Smart Shape ].
After drawing a line with the brush, ③[ press and hold ] without lifting your finger, and the shape detected from your freehand line is shown as a dashed line. While still holding, ④[ drag ] to adjust the angle and size of the detected shape.
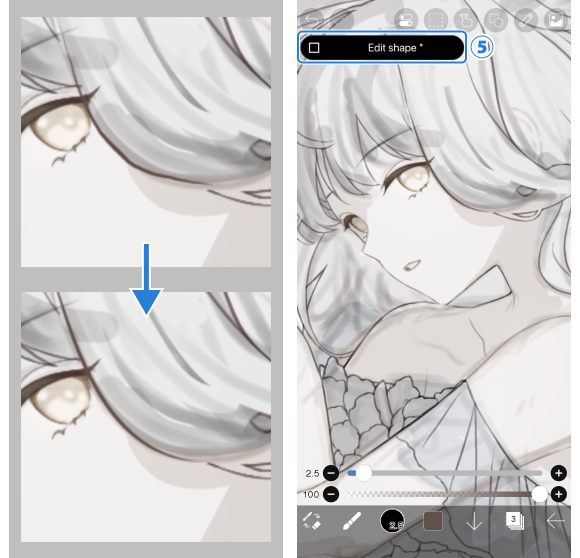
When you lift your finger, the line you drew with the brush is corrected to follow the detected shape. To edit the corrected shape, tap the ⑤[ Edit shape ] button at the top of the screen.
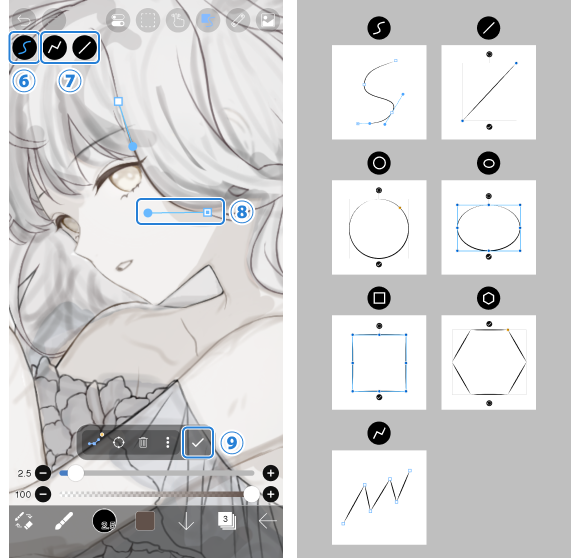
The ⑥[ icon of the selected shape ] is shown in blue. Tap one of the other candidate ⑦[ shape icons ] shown in white to switch to that shape. You can also drag the shape's ⑧[ handles ] to adjust its form. When you have finished editing, tap the ⑨[ ✓ Button ] or switch to another tool to confirm your edits.
Smart Shape supports curves, lines, circles, ellipses, rectangles, regular polygons and polylines.
If you created the shape on a "Vector Layer", you can still edit it with the Vector tool even after confirming your edits.
Smart Shape Settings
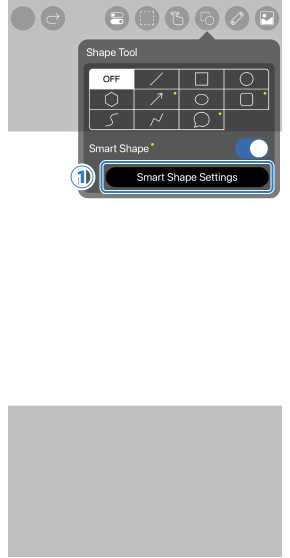
You can fine-tune the correction and priority settings of Smart Shape.
Tap ①[ Smart Shape Settings ] in the Shape Tool.
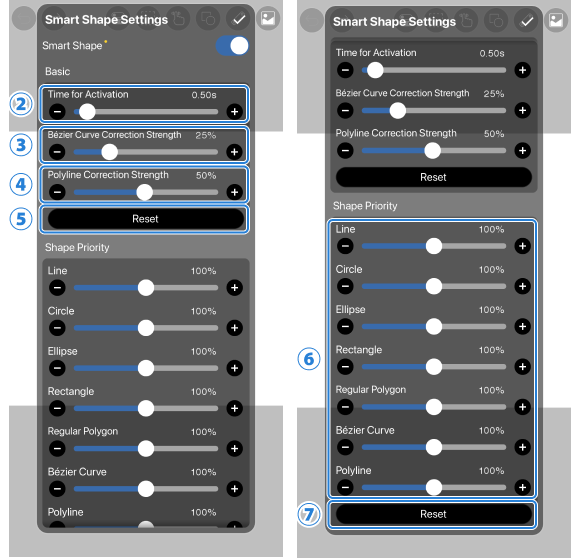
The Smart Shape Settings window appears.
②[ Time for Activation ] … Adjust the time from when you start pressing and holding until Smart Shape activates, between 0.1 and 5.0 seconds.
③[ Bézier Curve Correction Strength ] … The higher the value, the more strongly your freehand line is corrected when it is detected as a curve, and the fewer points (handles) make up the curve.
④[ Polyline Correction Strength ] … The higher the value, the more strongly your freehand line is corrected when it is detected as a polyline, and the fewer points (handles) make up the polyline.
Tap ⑤[ Reset ] to return the values of the "Basic" items to their defaults.
⑥[ Shape Priority ] … Individually adjust the detection priority of lines, circles, ellipses, rectangles, regular polygons, curves and polylines. The higher the value of a shape, the more likely it is to be chosen as a candidate.
Tap ⑦[ Reset ] to return the shape priority values to their defaults.
 Shape Tool
Chapter
-
 01.Introduction
 -
 02.Start Creating an Artwork
 -
 03.Toolbar and Tool Selection
 -
 04.Do Your Draft Sketch by Hand
 -
 05.About Layers
 -
 06.Let's Trace
 -
 07.Undo and Eraser
 -
 08.Fine Tuning Using the Lasso tool
 -
 09.Check by Reflecting Horizontally
 -
 10.Select Colors in the Color window
 -
 11.Use Color Fill for the Undercoat
 -
 12.Turn Clipping On
 -
 13.Making a Gradation (Shading)
 -
 14.Select a color from the canvas or layer
 -
 15.Set the Time before Quick Eyedropper Starts
 -
 16.Create Highlights and Shadows
 -
 17.Paste a Texture
 -
 18.Let's Merge Layers
 -
 19.Sign Your Artwork
 -
 20.View Your Artwork
 -
 21.Post Your Artwork
 -
 22.Share Your Artwork
 -
 23.Open your ibisPaint data in Clip Studio Paint
 -
 24.Premium Membership / Ad Removal Upgrade (for iPhone/iPad, Android)
 -
 25.Premium Membership / Pro Upgrade (for Windows, Mac)
 -
 26.Smart Features and Smart Credits
 -
 27.Synchronizing the artworks on your device with Cloud Storage
 -
 28.Save the past state of an Artwork as an IPV file
 -
 29.Rearrange artworks
 -
 30.Artworks Folder Feature
 -
 31.Make custom brush
 -
 32.Create Original Brush Patterns
 -
 33.Installing and Exporting the Custom Brush
 -
 34.Release a Custom Brush to the Online Gallery
 -
 35.Brush Export and Import
 -
 36.Search For Brushes
 -
 37.Display images to use as reference
 -
 38.Add Color to the Analog Image using Multiply
 -
 39.Stabilizer
 -
 40.Layer: Clipping is convenient
 -
 41.Layer: Changing the color with Alpha Lock
 -
 42.Layer: Let's try using Screen Tone
 -
 43.Layer: Selection Layer
 -
 44.Layer: Save Layer as Transparent PNG command
 -
 45.Layer: Naming your layers to manage them
 -
 46.Layer: Rasterize
 -
 47.Layer: Layer Folders
 -
 48.Layer: Move/Transform Layer Folder
 -
 49.Layer: Add Layer from Canvas
 -
 50.Vector Layer
 -
 51.How to edit a brush shape
 -
 52.Contents Layer Selection
 -
 53.Apply Canvas Papers to your canvas
 -
 54.Display Grid on the Canvas
 -
 55.Export an Artwork (Save)
 -
 56.Export in CMYK (Save)
 -
 57.Save canvas as Transparent PNG
 -
 58.Make the background transparent with Eraser Bucket
 -
 59.Bucket Tool: Surrounding Fill / Surrounding Eraser
 -
 60.Putting texture to the floor with Perspective Form
 -
 61.Skirt with Mesh Form
 -
 62.Entering text with Text tool
 -
 63.Creating manga with Frame Divider tool
 -
 64.Enlarging the canvas with Canvas Size
 -
 65.Cutting off the canvas with Trim
 -
 66.Create a Manga Manuscript for Printing
 -
 67.Canvas creation with resolution (dpi) specification
 -
 68.Changing image resolution with Resize
 -
 69.Change canvas Color Mode
 -
 70.Output High-Resolution Images with AI (Artificial Intelligence)
 -
 71.AI Disturbance
 -
 72.Texture with Material tool
 -
 73.Cut, Copy, Paste
 -
 74.Ruler: Straight Ruler
 -
 75.Ruler: Circular Ruler
 -
 76.Ruler: Elliptical Ruler
 -
 77.Ruler: Radial Ruler
 -
 78.Ruler: Mirror Ruler
 -
 79.Ruler: Kaleidoscope Ruler
 -
 80.Ruler: Array Ruler
 -
 81.Ruler: Perspective Array Ruler
 -
 82.Shape Tool
 -
 83.Drawing Tool: Straight Line
 -
 84.Drawing Tool: Rectangle
 -
 85.Drawing Tool:Circle
 -
 86.Drawing Tool:Ellipse
 -
 87.Drawing Tool:Regular Polygon
 -
 88.Drawing Tool:Bezier Curve
 -
 89.Drawing Tool:Polyline
 -
 90.Selection Area tool: Color Range
 -
 91.Selection Area tool: Expand/Contract Selection Area
 -
 92.Special: Liquify Pen
 -
 93.Special: Lasso Fill
 -
 94.Special: Lasso Eraser
 -
 95.Special: Copy Pen
 -
 96.Filter (Adjust Color): Brightness & Contrast
 -
 97.Filter (Adjust Color): Tone Curve
 -
 98.Filter (Adjust Color): Hue Saturation Lightness
 -
 99.Filter (Adjust Color): Color Balance
 -
 100.Filter (Adjust Color): Extract Line Drawing
 -
 101.Filter (Adjust Color): Find Edges (Handwriting)
 -
 102.Filter (Adjust Color): Find Edges
 -
 103.Filter (Adjust Color): Change Drawing Color
 -
 104.Filter (Adjust Color): Mono Color
 -
 105.Filter (Adjust Color): Grayscale
 -
 106.Filter (Adjust Color): Black & White
 -
 107.Filter (Adjust Color): Posterize
 -
 108.Filter (Adjust Color): Invert Color
 -
 109.Filter (Adjust Color): Gradation Map
 -
 110.Filter (Adjust Color): Levels Adjustment
 -
 111.Filter (Adjust Color): Replace Color
 -
 112.Filter (Blur): Gaussian Blur
 -
 113.Filter (Blur): Zooming Blur
 -
 114.Filter (Blur): Moving Blur
 -
 115.Filter (Blur):Spin Blur
 -
 116.Filter (Blur): Lens Blur
 -
 117.Filter (Blur): Mosaic
 -
 118.Filter (Blur): Unsharp Mask
 -
 119.Filter (Blur): Frosted Glass
 -
 120.Filter (Style): Stroke (Both)
 -
 121.Filter (Style): Stained Glass
 -
 122.Filter (Style): Wet Edge
 -
 123.Filter (Style): Glow (Inner)
 -
 124.Filter (Style): Bevel (Inner)
 -
 125.Filter (Style): Bevel (Outer)
 -
 126.Filter (Style): Emboss
 -
 127.Filter (Style): Relief
 -
 128.Filter (Style): Waterdrop (Rounded)
 -
 129.Filter (Style): Stroke (Outer)
 -
 130.Filter (Style): Glow (Outer)
 -
 131.Filter (Style): Satin
 -
 132.Filter (Style): Drop Shadow
 -
 133.Filter (Style): Extrude
 -
 134.Filter (Style): God Rays
 -
 135.Filter (Draw): Parallel Gradation
 -
 136.Filter (Draw): Concentric Gradation
 -
 137.Filter (Draw): Radial Line Gradation
 -
 138.Filter (Draw): Radial Line
 -
 139.Filter (Draw): Speed Line
 -
 140.Filter (Draw): Clouds
 -
 141.Filter (Draw): QR Code
 -
 142.Filter (Smart): Watercolor Filter
 -
 143.Filter (Smart): Background Removal
 -
 144.Filter (Artistic): Anime Background
 -
 145.Filter (Artistic): Manga Background
 -
 146.Filter (Artistic): Chromatic Aberration (Color Shift, RGB Shift)
 -
 147.Filter (Artistic): Glitch
 -
 148.Filter (Artistic): Noise
 -
 149.Filter (Artistic): Retro Game
 -
 150.Filter (Artistic): Chrome
 -
 151.Filter (Artistic): Bloom
 -
 152.Filter (Artistic): Cross Filter
 -
 153.Filter (Artistic): Sheer
 -
 154.Filter (Pixelate): Pixelate Crystalize
 -
 155.Filter (Pixelate): Hexagonal Pixelate
 -
 156.Filter (Pixelate): Square Pixelate
 -
 157.Filter (Pixelate): Triangular Pixelate
 -
 158.Filter (Pixelate): Pointillize
 -
 159.Filter (Pixelate): Dots (Hexagonal)
 -
 160.Filter (Pixelate): Dots (Square)
 -
 161.Filter (Transform): Expansion
 -
 162.Filter (Transform): Fisheye Lens
 -
 163.Filter (Transform): Sphere Lens
 -
 164.Filter (Transform): Wave
 -
 165.Filter (Transform): Ripple
 -
 166.Filter (Transform): Twirl
 -
 167.Filter (Transform): Polar Coordinates
 -
 168.Filter (Frame): Table
 -
 169.Filter (Frame): Blur Frame
 -
 170.Filter (Movie): Rain
 -
 171.Adjustment Layer
 -
 172.Create an animation
 -
 173.Animation Feature: Video Mode
 -
 174.Animation Feature: Audio Tracks in Video Mode
 -
 175.Manga Function: Let's create a manga manuscript
 -
 176.Manga Function: Master the Manga creation tools
 -
 177.Manga Function: Make Use of Materials
 -
 178.Manga Function: Publishing and Printing your Manga
 -
 179.Changing Devices & File Transfers
 -
 180.Settings window details
 -
 181.Change the Background Color of the Canvas
 -
 182.Details of Brush Parameters
 -
 183.Bucket tool details
 -
 184.Layer Window Details
 -
 185.Transform tool details
 -
 186.Blend mode details
 -
 187.View Menu details
 -
 188.How to upload transparent PNG onto X
 -
 189.Importing and exporting Photoshop files (PSD)
 -
 190.Posting Multiple Pages of Comic to the Online Gallery
 -
 191.Gestures, Keyboard shortcuts (iOS,iPadOS,Android versions)
 -
 192.Gestures, Keyboard shortcuts (Windows Version)
 -
 193.Display a Crosshair Symbol When Hovering the Stylus Pen
 -
 194.Set Up Palm Rejection
 -
 195.Use a Promo Code
 -
 196.About ibisAccount: Creating an Account
 -
 197.About ibisAccount: Log In
 -
 198.About ibisAccount: Delete Your Account
- Artwork Rankings

- Artist Rankings
- Official accounts


